Navigating the Seam & Stitch Manager Dialog
The Seam & Stitch Manager is a feature that makes 3D content more realistic and saves content creation time.
Seams refer to the way two pieces overlap when connected to each other. Stitches represent the shape of the thread that sews the pieces together.
With the Seam & Stitch Manager, you can define various components of your stitch in one place. For example, you can define the size of the needle, and trim (i.e., pipe) without having to assign rigid parts (as in previous versions of Optitex).
You can leave the Seam & Stitch Manager open while you are stitching, allowing you to assign components to multiple stitches simultaneously without having to reopen the window each time you want to define a stitch.
There are three ways to use the Seam & Stitch Manager:
-
Select a predefined preset (Optitex offers a library of presets) or use a customized preset.
-
A preset is a combination of a Seam/Stitch ( segment shape)/Trim (Pipe, Decorations, Zippers…) including defined attributes.
-
Create your own custom preset (by saving components and attributes).
-
Add stitches/trims/accessories and define attributes, then "Apply" to the stitch (without saving).
 Note:
This feature is available from version 15.6SP3 or later.
Note:
This feature is available from version 15.6SP3 or later.
You can change the working units that are used in the Seam & Stitch Manager via the preferences.
For example, if the working units are defined as inches, the values will appear in inches, etc.
To navigate the Seam & Stitch Manager dialog:
-
Open PDS.
-
From the main menu, go to View > 3D Windows > Seam & Stitch Manager.
Or
Select a stitch, right click and select Seam & Stitch Manager.
The main dialog looks like this: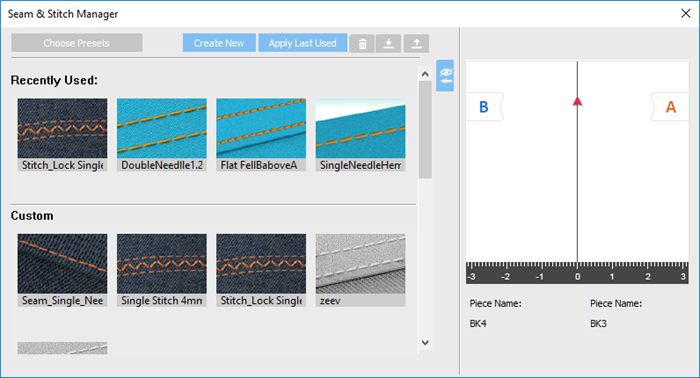
Preview Area
The preview area is collapsed by default. You
can expand/collapse the preview using the  /
/ buttons.
The preview area is dynamic. Any change you make is updated automatically.
This is to help you visualize the location of the components on piece A/B according to the seam.
When you select a stitch that connects two pieces, the piece name of each piece will be automatically assigned to A/B.
this allows you to place the components where you want on the seam.
You have two options for creating presets:
-
-
Choose Preset: Allows you to select a preset from the library.
-
Create New: Allows you to create your own custom preset.
-
In the Recently Used area, you can see the last used presets.
You will only see presets that were applied to stitches here.
If you save a preset but do not apply it to a stitch, it will not appear here.
All presets are added in counter-clockwise manner, meaning first one in is first out.
Before saving and applying a preset, the Recently Used area looks like this:
ZigZag appears at the end and DoubleNeedle1.2 is the first preset in the list.

After saving and applying a new preset, the Recently Used area now looks like this:
Pipe1 was added to the end and now FlatBellAboveA is the first one in the list.
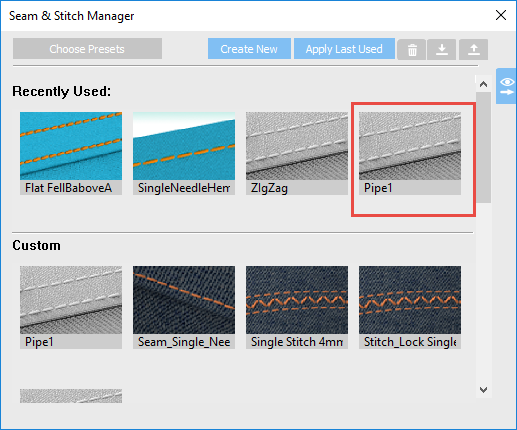
If you save a preset with the same name, it will not appear twice.
In the Custom area you can see your customized presets.
In the Optitex area, you can see a list of predefined presets provided by Optitex. These are included when installing Optitex.
These presets are read only and cannot be modified.
Click  if you want to use the same components/presets that were previously applied
to a stitch.
if you want to use the same components/presets that were previously applied
to a stitch.
Once you click Apply Last Used, the previous components/presets will be applied to the stitch and you will not have to define them again.
Note:
These features are available in version 15.6SP3 and later.
Click ![]() (Import), if you want to import
presets/components into the Seam & Stitch Manager. For more information,
see Importing
Presets/ Components into the Seam & Stitch Manager.
(Import), if you want to import
presets/components into the Seam & Stitch Manager. For more information,
see Importing
Presets/ Components into the Seam & Stitch Manager.
Click ![]() (Export), if you want to create
a ZIP file and then send to others. For more information, see Exporting
Presets.
(Export), if you want to create
a ZIP file and then send to others. For more information, see Exporting
Presets.
Click ![]() (Delete), if you want to remove
custom presets from the Seam & Stitch Manager. For more information,
see Deleting Presets.
(Delete), if you want to remove
custom presets from the Seam & Stitch Manager. For more information,
see Deleting Presets.
Note:
By default the preview area is collapsed. To expand it, click the expand
 button.
Once you either select a preset or click Create New, the following dialog appears (if you are creating new, the dialog appears empty):
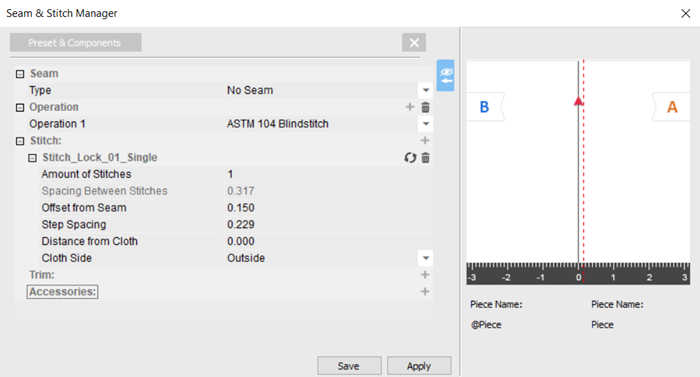
The dialog consists of the following sections:
|
Preset: " " |
Displays the name of the preset. |
|
|
Click to return to the main screen (Choose Presets). |
|
|
Click to expand/collapse the Preview area. |
|
Components |
|
|
|
Click to expand or collapse a section. |
|
Seam |
The way two pieces overlap when connected to each other. By default the seam is "No Seam". |
|
Stitch |
The shape of the thread that sews the pieces together. |
|
Trim |
Includes pipes, welting, and binding. |
|
Accessories |
Includes decoration, fur, and zippers. |
|
|
Click to delete the component. |
|
|
Click to replace the component with another component while saving the defined attributes. For more information, see Replacing a Component While Saving the Attributes. |
|
Save |
Click to save the preset's changes or create a new preset. For more information, see Saving a Preset. |
|
Apply |
Click to assign the components/presets to the stitch. The 3D Properties Stitches dialog is updated accordingly. |
|
|
Click to close the Seam & Stitch Manager dialog. |


 See
also:
See
also: