Stitch 3D Properties
Once you have selected a stitch (using the Select
Stitch tool  ) the 3D
Properties dialog appears with the stitch/element attributes.
) the 3D
Properties dialog appears with the stitch/element attributes.
There are two views:
-
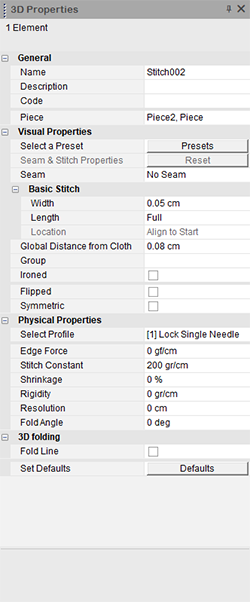
If no visual properties were defined on the stitch (via the Seam & Stitch Manager), the stitch appears as a Basic Stitch.
-
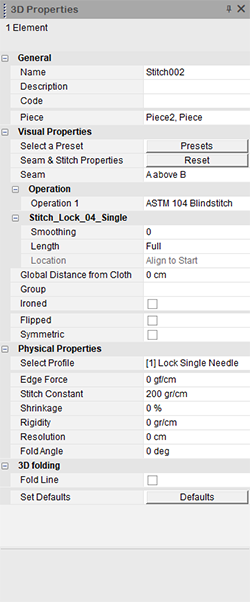
If visual properties were defined on the stitch (via the Seam & Stitch Manager), all components appear under the Visual Properties.
|
Basic Stitch
|
Visual Properties
|
The following attributes are available:
|
Field |
Description |
||||||||||||||||
|
General |
|
||||||||||||||||
|
Name |
Displays the stitch name. By default a system generated name is provided for all stitches by consecutive numbers, stitch1, sttich2, etc. |
||||||||||||||||
|
Description |
Displays a short description for the stitch. |
||||||||||||||||
|
Code |
Displays a descriptive code for the stitch, i.e., circular, straight, etc. |
||||||||||||||||
|
Piece |
Displays the piece your stitch is located on. This is a read only field. |
||||||||||||||||
|
Visual Properties |
|
||||||||||||||||
|
Select a Preset |
Click Presets to apply a preset to a stitch. You can select any of your presets without having to open the Seam & Stitch Manager. For more information, see Applying Presets Via the 3D Properties Dialog Note: This feature is available in version 15.6SP3 and later. |
||||||||||||||||
|
Seam & Stitch Properties |
Click Reset to remove all the seam and stitch properties you defined on the stitch. This removes all visual properties and returns the stitch to a basic stitch. Note: If you are viewing a basic stitch, this field is disabled. If visual properties were defined on the stitch, each component appears as a separate layer with the name of the component. The following attributes can be defined: Offset: Defines the distance of the stitch above or below the object's surface. Smoothing: Sets the smoothing level. Length: Defines the length of the stitch on the segment. Location: Defines the alignment of the stitch on the segment, can be from the start of the stitch or the end of the stitch. This field is only enabled if the stitch length is than full. |
||||||||||||||||
|
Seam |
Displays the seam type. |
||||||||||||||||
|
Basic Stitch |
If the stitch was not defined via the Seam & Stitch Manager, the stitch is a basic stitch and the following attributes can be defined: Offset: Defines the distance of the stitch above or below the object's surface. Smoothing: Sets the smoothing level. Length: Defines the length of the stitch on the segment. Note: If you change the length and want to go back to the default value, delete the value and press Enter. Location: Defines the alignment of the stitch on the segment, can be from the start of the stitch or the end of the stitch. This field is only enabled if the stitch length is not Full. |
||||||||||||||||
|
Global Distance from Cloth |
Shifts all the components according to a defined distance, relative to the Distance from Cloth parameter defined in the Seam & Stitch Manager. Note: This feature is available in version 15.6SP3 and later. |
||||||||||||||||
|
Group |
Groups are used when you want to apply the same visual properties to a group of stitches. Once you create a group, the name appears in the drop-down list and you can then assign another stitch to the same group. |
||||||||||||||||
|
Ironed |
Select this checkbox, if you require a top stitch, or a crisp iron line such as creases, facings, pleats, or lapels. |
||||||||||||||||
|
Flipped |
Select this checkbox, if you need to flip the direction of the stitch. |
||||||||||||||||
|
Symmetric |
Select this checkbox, if you are stitching a piece to a paired piece. Notice that once the Symmetric definition is enabled, the Flipped definition is also enabled automatically. |
||||||||||||||||
|
Physical Properties |
|
||||||||||||||||
|
Select Profile |
From the drop-down list, select the type of stitch you require. All stitch types available in the library appear. |
||||||||||||||||
|
Edge Force |
The Edge Force value is a force of specified weight (in grams) pulling the cloth in its direction. It is very sensitive and any slight change made to it can affect the simulation. The Edge Force value is directly effected by the cloth's physical attribute of stretch, and any change in this value will affect the way the Edge Force will work. As the Stretch value grows higher, the Edge Force value needed to pull the cloth also grows higher. |
||||||||||||||||
|
Stitch Constant |
Defines stitch stretch resistance with allowed range of values [0-5,000 gr/cm]. Default stitch constant value is set based on two things:
Note: We recommend to use stitch profile to set the stitch constant. Stitch Constant could also be changed by the user manually in the Panel. The value of 0 (Zero), has a special meaning signifying that stitch should inherit its stretch resistance from the piece material. We recommend to use this value on bias cut patterns. The higher the value, the higher is stitch resistance to stretch and therefor the less stitch is going to be stretched during the simulation process. |
||||||||||||||||
|
Shrinkage |
Enter the amount of shrinkage in a percentage % (from relaxed to finished). For example: 8 to 4 cm is 50% shrinkage. Use this value in cases where you need:
Note: This value is affected by the Stitch Constant value. If the Stitch Constant value is higher, then the Stitch will have more ‘Power’ to shrink. If the Stitch Const value is lower, the stitch will not have ‘Power’ to shrink. |
||||||||||||||||
|
Rigidity |
Using the up and down arrows, set the rigidity of the stitch to define how rigid the stitch is relative to the fabric that stitches it together. A value of 1 indicates that the rigidity is similar to the fabric, while a value of 100 means the stitch is up to 100 times more rigid than the fabric. |
||||||||||||||||
|
Resolution |
Enter the resolution of the stitch. This helps determine the size of the triangle's edges from which the stitch mesh is made of. If you lower this value you will get a high re-stitch. |
||||||||||||||||
|
Fold Angle |
Enter the required fold angle in degrees. This allows you to set the angle between stitched surfaces. |
||||||||||||||||
|
3D Folding |
|
||||||||||||||||
|
Fold Line |
Select this checkbox, if you want to create a fold line, for example to fold a cuff, collar or lapel. Once you select this option, additional fields appear. For more information about the different options, see Using 3D Folding. |
||||||||||||||||
|
Set Defaults |
Select Defaults if you want to return all properties to the default values. |