Relate Piece To Stripes
This command is used to align pieces on the fabric according to defined stripe lines. The matching is done per piece, for example, every piece is related to the stripes – this way all the pieces will match properly. Make sure to relate a piece only on the necessary axis (X or Y), so when nesting, results will be improved.
Notes:
-
It is possible, but not recommended, to relate a piece with no stripe adjust notch/ button.
-
It is possible and recommended to define the stripes and the Stripe Adjustment in the PDS. For more information, see Relate Piece To Stripes.
Icon & Location
-

-
Menu: Marker>Fabric and Stripes>Relate Piece to Stripes
-
Toolbar: Marker Tools
To relate piece to stripes:
First, you have to define the stripe's definitions, see Stripe Definition.
Next you have to enable stripe adjust. From the main menu, go to Options > Stripe Adjust.
Place your pieces on the Marker table.
Optional but recommended: Make sure a notch/ button with Stripe adjustment is present on the selected piece(s).
From the main menu,
go to Marker > Fabric and Stripes
> Relate Piece to Stripes.
The Relate Piece to Stripes dialog
appears:
This dialog is dynamic according to how you defined the stripes in the
Strip Definition dialog; therefore
the content is according to what was defined. For example, if you defined
an X distance, then you can define the distance for the piece at the X
axis, if not the Use X checkbox will be grayed out. In the example below
the stripes were defined with an X distance only; therefore the Use Y
option is disabled.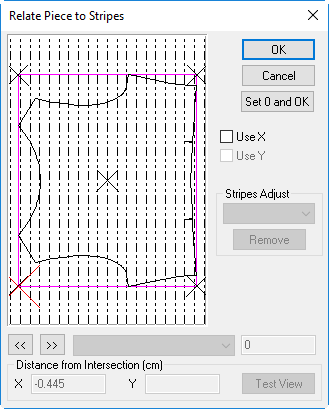
Define the X and Y values according to what was defined earlier. Select the Use X checkbox, then in the XDistance from Intersection field, enter the X value.
Select the Use Y checkbox, then in the YDistance
from Intersection field, enter the Y value.
Or
You can use the double arrows to change the X/Y distance by moving the
piece.
If your piece contains multiple notches/buttons, you can select a match point according to a specific object. Select the object from the drop-down list and adjust the piece according to the object.
Click Test View to view a preview. If you make changes using the double arrows, the preview updates automatically.