Nesting Your Pieces
Once you have placed your pieces you are now ready to nest. Nesting is an algorithm that automatically places the pieces on the Marker while providing the best optimization of your layout within a short amount of time. With nesting you get the best efficiency of fabric usage to maximize production profit. Optitex provides three Nesting solutions: Standard (is free when purchasing the software) Nest++1, Nest++2 and Nest++2 Multicore Pro.
The nesting procedure is dynamic according to the type of algorithm you chose. We will provide an overview of all the solutions with a short procedure.
Click a nesting solution to read more information.
 Note: Starting from 15.3, you can now run multiple nestings at the same time.
Simply start nesting, then open the Marker and start another nesting process.
This feature only works with CodeMeter dongles starting from version 6.0
build 6154 and will only work if your license is updated with Parallel
Nesting. Contact your Optitex representative, if you encounter any issues
or if you need to request the module.
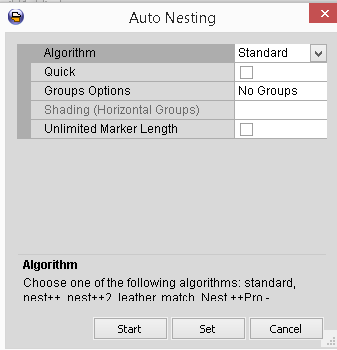
Standard nesting is the most basic algorithm. It includes limited options compared to the advanced nesting algorithms. It places the pieces only once, and doesn’t keep looking for better solutions. The Standard solution is a quick solution as it can produce results in less than a minute.
-
Go toNesting > Auto Nesting Setup.
-
From theAlgorithmdrop-down list, selectStandard:

-
If you want the pieces to be nested faster, select theQuickcheckbox. This will make the process faster, however it will affect the efficiency.
-
If you want to nest by bundles, from theGroups Optionsdrop-down, selectAccording to Bundles.
-
If you have bundles in shaders and you have an extra bundle thus causing you to loose space, you can use theShading Horizontal Groupsoption. This will cause the last bundle to be nested over the marker width. This will increase the marker efficiency.
-
Select the Unlimited Length checkbox, if you do not want the marker length to be restricted according to the Marker Definition settings.
-
Click Set to save the settings so you can use the settings again.
-
Click Start to start the nesting process.
During nesting, the mouse cursor changes and the pattern pieces start to fill the marker. The nesting process uses a lot of resources from your computer’s cpu; therefore all other commands in the Marker are disabled while nesting. The only available command is the STOP nesting command, which stops the nesting process and makes the marker commands available again.
-
Go toNesting> Auto Nesting Setup.
-
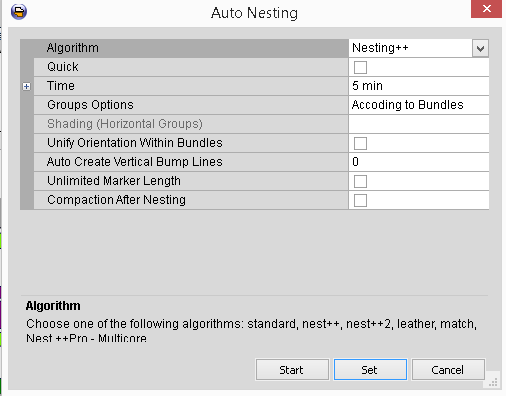
From theAlgorithmdrop-down list, selectNesting ++:

-
Select theQuickcheckbox, if you want the pieces to be nested faster.
-
If you set the maximum time for the algorithm to run, the algorithm will keep checking for a better layout solution until the maximum time is reached. In theTime field, enter the maximum time.
-
If you want to nest by bundles, from theGroups Optionsdrop-down, selectAccording to Bundles.
-
If you have bundles in shaders and you have an extra bundle thus causing you to loose space, you can use theShading Horizontal Groupsoption. This will cause the last bundle to be nested over the marker width. This will increase the marker efficiency.
-
Select theUnify Orientation within Bundlescheckbox, if you want nest the pieces according to a unique bundle orientation. Each bundle will be place in the opposite direction.
-
Select theAuto Create Vertical Bump Linescheckbox, if you want to create bump lines that are vertical.
-
Select theUnlimited Marker Lengthcheckbox, if you do not want the marker length to be restricted according to the Marker Definition settings.
-
Select the Compaction After Nesting checkbox, if you want to implement compaction after the nesting process has completed.
-
Click Set to save the settings so you can use the settings again.
-
Click Start to start the nesting process.
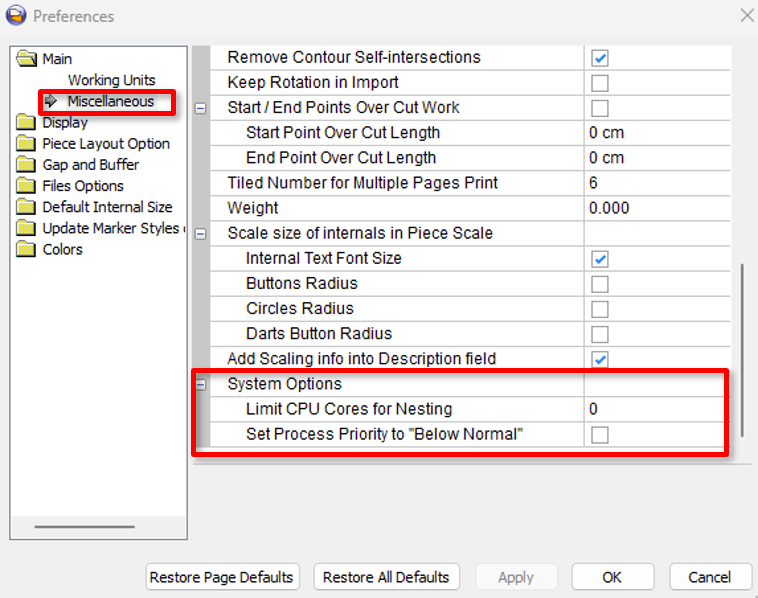
 Note: If
you want to control the number of processor cores used by the nesting
algorithm or define the process priority, you can set it in the preferences:

0 is the defait for cpu limit and it equalls no Limit.
To run nesting:
-
Go toNesting> Auto Nesting Setup.
-
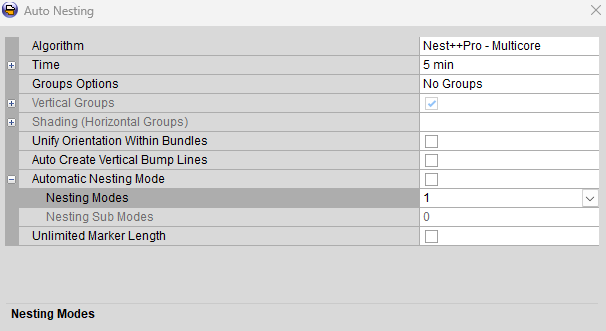
From theAlgorithmdrop-down list, selectNest ++ Pro

-
If you set the maximum time for the algorithm to run, the algorithm will keep checking for a better layout solution until the maximum time is reached. In theTime field, enter the maximum time.
-
If you want to group your pieces, choose an appropriate option from the Groups Optionsdrop-down:
-
Choose the According to Bundles option, if you want that pieces belonging to the same bundle will be placed nearby after the nesting.
-
Choose the According to Sizes option, if you want that pieces of the same size same will be placed nearby after the nesting.
-
Choose the According to Pieces Sequence option, if you want to perform the grouping according to piece sequence as they appear in the Piece Bar. In such a way all piece instances belonging to the same piece item in the Piece bar will be placed nearby.
-
If you have fabric with non-uniform shading across the fabric roll, you could take it into the consideration during nesting. In the result, piece groups will be placed within single shading area. For more information, refer to Color Shading Markers topic.
-
Select theUnify Orientation within Bundlescheckbox, if you want nest the pieces according to a unique bundle orientation. Each bundle will be place in the opposite direction.
-
Select theAuto Create Vertical Bump Linescheckbox, if you want to create bump lines that are vertical.
-
Automatic Nesting Mode (V23, or later) keep unchecked.
-
Nesting Modes: Make sure to use Mode 1
-
- Select theUnlimited Marker Lengthcheckbox, if you do not want the marker length to be restricted according to the Marker Definition settings.
-
Select the Compaction After Nesting checkbox, if you want to implement compaction after the nesting process has completed.
Compaction after nesting
 Note:
Starting from version 15.6SP3 this option is no longer available.
The compaction after nesting is automatically included in the Nest
Pro algorithm.
-
If you want to run a post nesting process in order to save space especially between smaller pieces, select the Optimize Space for Cutting Checkbox.
-
Select how you want to run the process, either Define Small Pieces Automatically , meaning the system will automatically re size the area between the pieces
Or
In the Small Pieces Area, field, enter the amount of space you want between pieces.
-
Click Set to save the settings so you can use the settings again.
-
Click Start to start the nesting process.
 See also: Getting to Know Optitex Marker