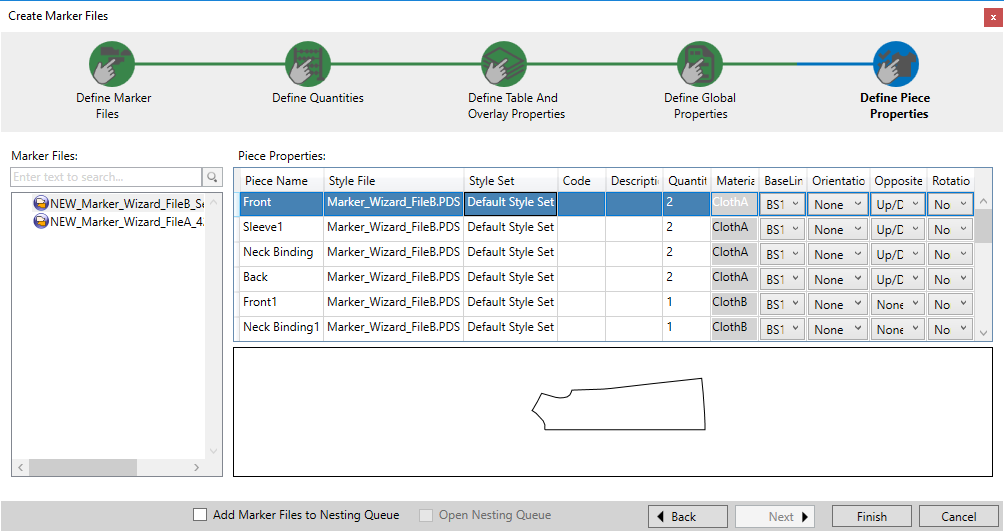
Defining Piece Properties
This step allows you to preview all the pieces that are included in the current Marker file, and define specific piece properties, such as code, description, quantity, etc.
Note: This dialog contains some fields that are available in the Piece Info dialog. For more information, see Piece Properties.

-
On the right hand side, you can see the Marker file you previously defined.
-
The table is dynamic according to the Marker file you have selected; therefore the content changes in the table each time a Marker File is selected.
-
You can easily search for Marker files in the Search bar, if for example you have a lot of Marker Files and you want to select a specific file.
To define piece properties:
Select the row of
the Marker file you want to define.
Notice all piece properties of the selected Marker file appear in the table.
Each piece appears in a separate row:
You can use the quick
menu to perform various actions to the cells in the table. To access the
quick menu, ![]() click
here.
click
here.
The table contains the following columns:
|
Column |
Description |
|
Piece Name |
Displays the name of the piece as it was defined in the Style File. This row is read only. When you click on a piece name, a preview of the piece appears. |
|
Style File |
Displays the Style File name where the piece originated from. This row is read only. |
|
Style Set |
Displays the name of the Style Set where the piece originated from. This row is read only. |
|
Code |
Displays the code that was assigned to the piece. This row can be edited. |
|
Description |
Displays the description that was assigned to the piece. This row can be edited. |
|
Quantity |
Displays the number of instances of the piece. This row can be edited. |
|
Material |
Displays the material that was assigned to the piece. This row is read only. |
|
Baseline |
Displays the baseline of the piece. To select a different baseline, click the drop-down box and select another option (if available). |
|
Orientation |
Displays the orientation of the piece. To select a different orientation, click the drop-down list and select one of the following options: None: Piece orientation is not available. Left: Left orientation is set to the piece. The L letter appears within the description. When the Left orientation is chosen, the orientation of the opposite piece is automatically set to be Right. Right: Right orientation is set to the piece. The R letter appears within the description. When the Right orientation is chosen, the orientation of the opposite piece is automatically set to be Left. |
|
Opposite |
Displays the opposite piece direction (if the piece is Paired). To select a different option, click the drop-down list and select one of the following options: None: The opposite piece is not available. Up/Down: The opposite piece is obtained by vertically mirroring the piece's geometry. Left/Right: The opposite piece is obtained by horizontally mirroring the piece's geometry. |
|
Rotation |
Displays the rotation that was assigned to the piece. To select a different rotation, click the drop-down list and select one of the following options: 1-Way: In this case rotation is not allowed; pieces can be placed only in base orientation with no rotation. 2-Way: In this case only 180 degrees rotation is allowed, i.e. pieces can be placed either in base orientation or rotated by 180 degrees. 4-Way: In this case only incremental 90 degrees rotation is allowed, i.e. pieces could be placed either in base orientation or incrementally rotated by 90 degrees relative to base orientation. 8-Way: In this case only incremental 45 degrees rotation is allowed, i.e. pieces can be placed either in base orientation or incrementally rotated by 45 degrees relative to base orientation. Any: In this case rotation is allowed for any angle. |
You have now completed the step of defining piece properties.
Proceed to the last step, Finishing the Marker File Creation.