Using the Fabric Pattern Dialog
You can use the Fabric Pattern dialog when you want to add different materials to be used as fabrics in your pattern. Here you can upload images, define a main material, define the fabric parameters such as size, gap, offset, etc. and more.
To use the Fabric Pattern dialog:
-
Open the PDS.
-
From the Main toolbar, go to Piece > Fabric and Stripes >Fabric Pattern.
The Fabric Pattern dialog appears: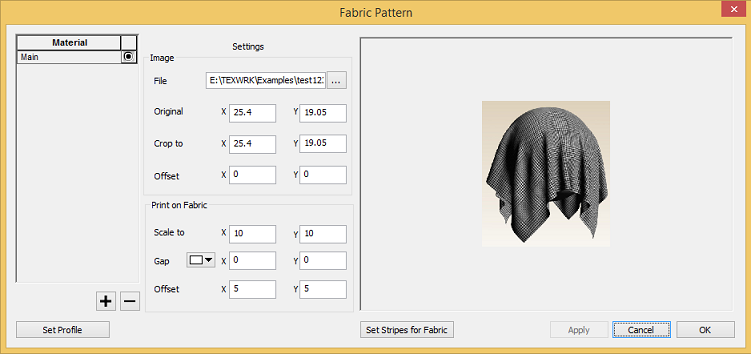
The Fabric Pattern dialog includes the following fields:
|
Field |
Description |
|
Material |
Use the + and - to add or remove materials. Select the Main radio button to indicate which material is active. |
|
Settings: Image |
Defines the properties of the printed image. |
|
File |
Select the browse button to search for an image that will be used as the material. JPG, PNG and BMP files are supported. Note:
|
|
Original |
Indicates the actual print size of the image. Change the X (width) and Y (height) to set your own dimensions. |
|
Crop To |
Indicates the area in the image that is going to be printed. Change the X (width) and Y (height) to crop the dimensions. |
|
Offset |
Indicates the offset of the printed image. Change the X axis and Y axis to set the offset. |
|
Settings: Print on Fabric |
Defines the properties of the print on the fabric. |
|
Scale To |
Indicates the actual size of the image. Change the X (width) and Y (height) to set your own dimensions. |
|
Gap |
Indicates the gap between images. You can change the gap when you want to add more space. Note: The gaps appear when the picture is located in the 2D background. |
|
|
Click to select a color to represent the gap in the fabric pattern. |
|
Offset |
Indicates the X and Y offset of the image. Change the X and Y to set the horizontal and vertical distance. |
|
Set Profile |
Click to save all the fabric definitions into an FPF (Fabric Pattern Profile) file. This file is used to coordinate settings between the PDS and the Marker. |
|
Set Stripes for Fabric |
Click to define stripes on your fabric. This allows you to define the way the pieces are laid out within the boundaries of the stripes. For more information, see Defining Stripes on the Fabric. |
