Button Stitch 3D Properties
If the 3D properties panel is open (press 8 on the keyboard), when you
have selected a button stitch in 2D (using the Select
Stitch tool  )
)
The 3D Properties dialog appears with the button stitch attributes:
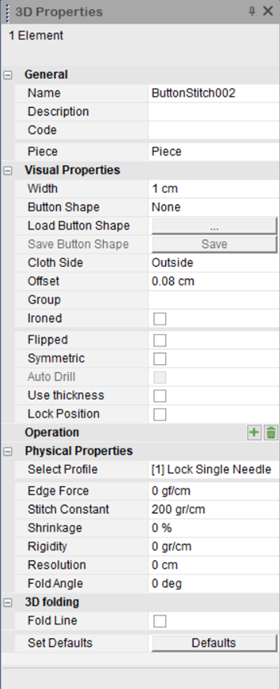
The following attributes are available:
|
Field |
Description |
|
General |
|
|
Name |
Displays the stitch name. By default the name is Button Stitch. |
|
Description |
Displays a short description for the stitch. |
|
Code |
Displays a descriptive code for the stitch, i.e., circular, straight, etc. |
|
Piece |
Displays the piece your stitch is located on. This is a read only field. |
|
Visual Properties |
|
|
-Width |
Defines the width of the stitch. |
|
Button Shape |
Displays and allows you to select all button shapes available in the PDS file. |
|
-Rotate (if a button shape is loaded) |
Set the rotation of the button shape. You can either use the slider or enter a value manually. |
|
-Symmetry (if a button shape is loaded) |
Determines if the button shape appears on both sides, left side or right side. This option only works for pair or half/mirror pieces. Make sure you define the piece with an even quantity and that the piece's 2D orientation is set to Left or Right. |
|
-Auto-Positioning (if a button shape is loaded) |
If turned on, the shape positions itself automatically to match the array, if turned off, you can manually position the shape using the Transform tool. |
|
-Lock Rotation (if a button shape is loaded) |
Prevents the button shape from rotating when refreshing |
|
-Enable Collider (if a button shape is loaded) |
Allows the button shape to rebound against other surfaces during simulation. This protects the button shape from colliding with the cloth. |
|
-Auto Scale (if a button shape is loaded) |
Scale the shape's dimensions in a proportional manner, according to the location of two or more stitches. |
|
Load Button Shape |
Load and assign a button shape to your button stitch. For more information, see Using Button Shapes. |
|
Save Button Shape |
Save the embedded rigid part to your local directory. For more information, see Using Button Shapes. |
|
Cloth Side |
Set button shapes to be displayed on the back side (inside) or front side (outside) of the cloth. |
|
Offset |
Set the distance of the stitch above or below the object's surface. |
|
Group |
Groups are used when you want to apply the same properties to a group of stitches. Once you create a group, the name appears in the drop-down list and you can then assign another stitch to the same group. |
|
Ironed |
Select this checkbox, if you require a top stitch, or a crisp iron line such as creases, facings, pleats, or lapels. |
|
Flipped |
Select this checkbox, if you need to flip the direction of the stitch. |
|
Symmetric |
Select this checkbox, if you are stitching a piece to a paired piece. Note that once the Symmetric definition is enabled, the Flipped definition is also enabled automatically. |
|
Auto Drill |
Select this checkbox if you want to define 4 drills (buttons). This can be used for a Fish Eye Dart. * See below for how to create a fish eye dart with buttons. |
|
Use Thickness |
Select this checkbox, if you want your stitch to be thick. |
|
Lock Position |
Select this checkbox, if you want to lock the button's position when simulating. |
|
Physical Properties |
|
|
Select Profile |
From the drop-down list, select the type of stitch you require. All stitch types available in the library appear. |
|
Edge Force |
The Edge Force value is a force of specified weight (in grams) pulling the cloth in its direction. It is very sensitive and any slight change made to it can affect the simulation. The Edge Force value is directly effected by the cloth's physical attribute of stretch, and any change in this value will affect the way the Edge Force will work. As the Stretch value grows higher, the Edge Force value needed to pull the cloth also grows higher. |
|
Stitch Constant |
This value is meant to maintain the stitch in its original length. The higher the value, the less the stitch is going to be stretched during the simulation process. Stitch Constant range is 0 to 400. Stitch Constant value of 100 is a good standard for Double Needle. If you don’t set a Stitch Constant value, the stitch will get the power of the fabric (the Stretch power – X or Y - the highest one between them. |
|
Shrinkage |
Enter the amount of shrinkage in a percentage % (from relaxed to finished). For example: 8 to 4 cm is 50% shrinkage. Use this value in cases where you need:
Note: This value is affected by the Stitch Constant value. If the Stitch Constant value is higher, then the Stitch will have more ‘Power’ to shrink. If the Stitch Constant value is lower, the stitch will not have ‘Power’ to shrink. |
|
Rigidity |
Using the up and down arrows, set the rigidity of the stitch to define how rigid the stitch is relative to the fabric that it stitches together. A value of 1 indicates that the rigidity is similar to the fabric, while a value of 100 means the stitch is up to 100 times more rigid than the fabric. |
|
Resolution |
Enter the resolution of the stitch. This helps determine the size of the triangle's edges from which the stitch mesh is made of. If you lower this value you will get a high re-stitch. |
|
Fold Angle |
Enter the required fold angle in degrees. This allows you to set the angle between stitched surfaces. |
|
3D Folding |
|
|
Fold Line |
Select this checkbox, if you want to create a fold line, for example to fold a cuff, collar or lapel. |
|
Set Defaults |
Select Defaults if you want to return all properties to the default values. |
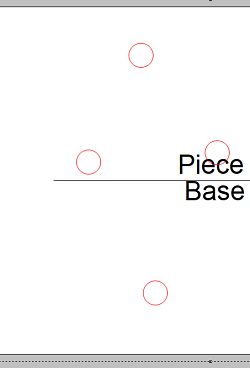
Auto Drill: Creating a Fish Eye Dart With Buttons
-
First, create four buttons on the piece.
-
Select the Stitch tool.
-
Left-click on the first button; then left-click on the second button (the next button in a clockwise direction); then right-click on the second button; then left-click on the third button; then right-click on the third button; then left-click on the fourth button.
-
Next, select one of the created button stitches.
-
Open 3D Properties and select the Auto Drill option.
-
Place the cloth.
 See
also: Using Button Shapes
See
also: Using Button Shapes