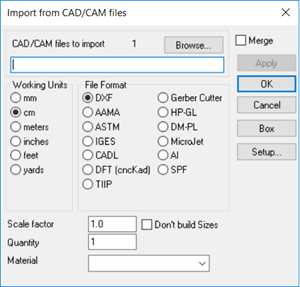
Import from CAD/ CAM Files
You can use the Import from CAD/CAM File option, when you want import another CAD/CAM file to be used in the PDS/Marker.
Icon & Location
-

-
PDS Menu: File> Data Exchange> Import from CAD CAM Files
-
Modulate Menu: File > Import from CAD CAM Files
-
Marker Menu: File> Data Exchange> Import from CAD CAM Files
-
Marker Toolbar: System Tools
To import from CAD/CAM files:
-
From the main menu, go to File> Data Exchange > Import from CAD/CAM Files.

-
Click Browse, to select the files you want to import. (You can import multiple files at once).
-
Select the Merge checkbox, if you want to merge the imported styles with the file that is currently open.
-
In the Working Units area, select the radio button of the working units you require for the imported file.
-
In the File Format area, select the radio button of the file format you are importing.
-
In the Scale Factor field, enter the scaling you require. This is used if the imported style is too big or small.
-
Select the Don't build Sizes checkbox, if you want to import all patterns into separate pieces. By default, the import process joins all pieces with the same name to one single piece in different sizes, and will display then as grading nest (only if sizes are defined in the import file).
-
In the Quantity field, enter the number of imported pieces you want.
-
In the Material field, select the material for all pieces that do not have a material assigned to them from the drop-down list.
-
When you are done, click Ok or Box.
Box imports the whole file, even if there are several pieces -as internal in a single rectangle. This is used when some pieces are not imported correctly, since they have an open contour (or the system thinks they have an open contour). This is also used when importing a whole Marker.
Learn more here on how to import CAD files into PDS
 See also: Data Exchange Menu