Marker Notch/ Button Tool
This Tool will allow you to add, edit or delete Notches and Buttons on the pieces.
Icon & Location
 (N)
(N)
To add a Notch:
-
Click the Notch tool.
-
Click at the location you would like to add the notch. The Edit Notch dialog box will be displayed.
-
Select the desired Notch Attributes.
-
Click OK.
-
The notch is added to the selected piece.
Create/Edit Notch Dialog Box
-
Click the Notch/Button tool.
-
Select the Notch you would like to edit. The Edit Notch dialog box will be displayed.
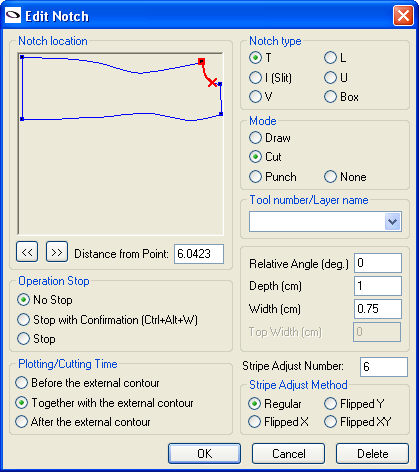
Notch Type
There are six types of notches. Define the type of notch you would like cut on your piece. The T and I notch will both be cut as a slit notch on a numerically controlled (NC) cutter.
Notch Mode
If you have a numerically controlled (NC) cutter, you can define whether you would like the notch to be drawn, cut, or punched. The result of each attribute is different depending on the type of output machine. Some machines can produce a single notch with different tools: Pen, Knife or a Special Punch tool. On different machines you might find different knives: Circular, Tangential or Jig knives. Each one its their own advantages and limitations.
Relative Angle
This option allows you to change the angle of the notch. For example, if you would like the V notch to point out instead of in, apply a 180 degree angle to the V notch.
Depth, Width and Top Width
Depth - allows you to change
the depth of the notch.
Width - allows you to change the
width of the notch. Usually the width is twice the depth.
Top Width - allows you to change
the width of the notch. To create an Castle like notch.
Stripe Adjust Number
This option is used to match a piece on the notch to a stripe or plaid line. For more information, see stripes and Relate Piece to Stripes.
Operation Stop
If you have a numerically controlled (NC) cutter, define if you would like the cutter to stop cutting the notch Before With A Confirmation, After With A Confirmation, Before (without a confirmation), After (without a confirmation), or No Stop (no stop at all).
Plotting/cutting Time
Define if you want the Notch to be Plot/Cut Before the external Contour, Together with The External Contour or After The External Contour.
Delete
Press on the 'Delete' button if you want to delete the Notch
To add a Button:
-
Click the Notch tool.
-
Click at the location you would like to add the button. The Edit Button dialog box will be displayed.
-
Select the desired Button Attributes.
-
Click OK.
-
The button is added to the selected piece.
Create/Edit Button Dialog Box
-
Click the Notch/Button tool.
-
Click on the Notch you would like to Edit. The Edit Notch dialog box will be displayed.
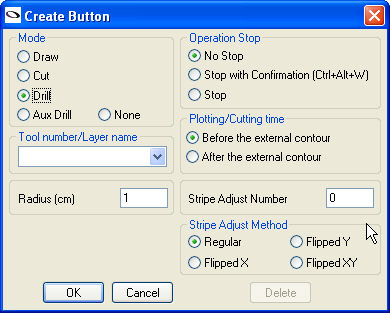
Button Mode
The Mode option will allow you to define which tool the numerically controlled (NC) cutter will use to cut or draw the selected internal. Choose from Draw, Cut, Drill, Aux Drill and None.
Operation Stop
If you have a numerically controlled (NC) cutter, define if you would like the cutter to stop cutting the Button Before With A Confirmation, After With A Confirmation, Before (without a confirmation), After (without a confirmation), or No Stop (no stop at all).
Plotting/Cutting Time
Define if you want the Notch to be Plot/Cut Before the external Contour or After The External Contour
Stripe Adjust Number
This option is used to match a piece on the Button to a stripe or plaid line. For more information, see stripe and Relate Piece to Stripes.
Radius
Define the size of the button to be cut.
Delete
Press on the 'Delete' button if you want to delete the Button.
 See also: Marker General Tools Toolbar