Holes and Internal Contours
The Holes and Internal Contours tool allows you to modify the properties of holes and internal contours of a piece.
Icon & Location
-

-
Menu: Piece > Internals > Holes and Internal Contours
-
Toolbar: Piece Tools
To use the Holes and Internal Contours tool:
Open the Marker.
Create/open a file.
Select a piece that
contains either holes or internals.
From the main menu,
go to Piece > Internals > Holes
and Internal Contours.
The Holes and Internal Contours
dialog appears: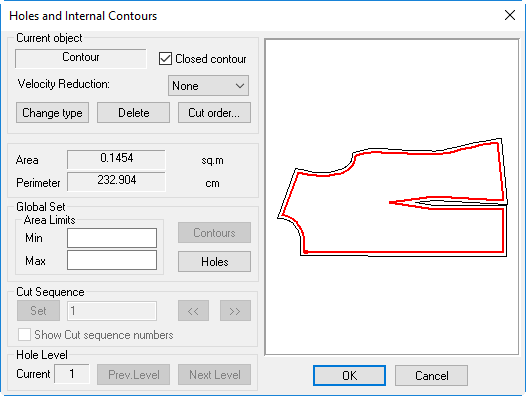
Notice the preview displays the piece that you selected.
Modify the attributes as follows:
View the type of object in the Current Object field. In this case, it's a contour.
Select the Close Contours checkbox, if you want to open the contour.
From the Velocity Reduction drop-down list, select the amount of speed of the cutting tool relative to other pieces.
Click Change Type, if you want to change the internal contour to a hole or vice versa.
Click Delete, if you want to remove the hole/internal contour.
Click Cut Order if you want to define the cut order of the internal contour/hole. This opens the Cut Order Optimization dialog. For more information, see Cutting Order.
View the Area and Perimeter of the internal contour/hole/.
In the Global Set Area Limits area, enter the Min/Max values if you want to set the area of the hole/internal contour.
Click either Contours or Holes if you want to switch the object type.
In the Cut Sequence area, view and or change the order in which the contours will be cut.
Click Ok when you are done.