Tagging Meshes
You can tag meshes when you want to tag content in your non-Optitex avatar. This is done in the Model Tree tab. Once you tag, all properties that are tagged appear in the Tagged Properties tab.
To save you time, you can tag multiple meshes by pressing Ctrl/Shift on your keyboard. This can be helpful, if for example you want to create one category for "Shoes" and you have more than one mesh for shoes.
To tag meshes:
Go to the Model Tree tab.
Under Meshes,
select the mesh you want to tag, for example, Collider_L_Hand.
Or
If you want to create a tag for more than one mesh, press Shift/Ctrl
and then select the meshes you require.
Right click with
your mouse and select Tagging Menu.
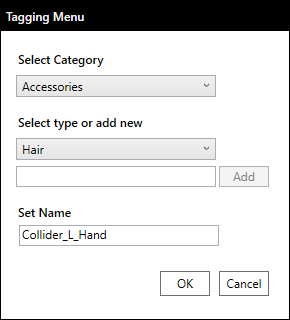
The Tagging Menu dialog appears:
From the Select Category drop-down list, select the category you require. The following options are available: Accessories/Add-ons.
From the Type
drop-down list, select the type you require.
The list is dynamic according to the category you selected. For example,
if you select Add-ons, the options
available include: Colliders/Shoulder
Pads.
Or
If you want to create your own type, in the blank field enter a new type,
and then click Add.
Notice the new type appears in the list and can be selected.
In the Set
Name field, you can create your own name of the tagged property.
Note:
By default, the name of the mesh appears. If you change the name, this
does not change the original name in the Model
Tree tab.
Click Ok
when you are done.
If you go to the Tagged Property
tab, you can see the newly tagged content.
If you want to edit the tagged property; for example if you want to translate the name, right-click on the tagged property, then select Rename.
Now repeat the above steps for all meshes you are tagging.