Using the Plot Dialog
You can use the Plot dialog when you want to plot or cut the pieces in your PDS file. Files can be plotted on a plotting device connected directly to one of the serials or parallel ports on your machine, or on any PC on the network.
To use the Plot dialog:
-
Open the PDS.
-
From the Main toolbar, go to File> Plot.
-
Define the Plotter/Cutter and clickOk.
The Plot dialog appears:
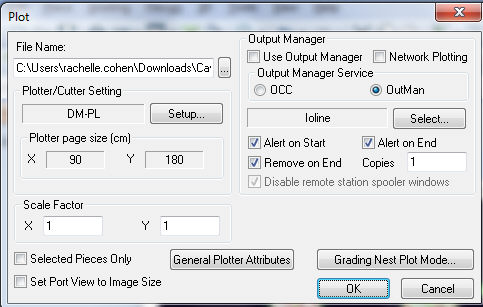
The Plot dialog includes the following fields:
|
Field |
Description |
|
File Name |
The path where the plotter file is saved. Note: If you are using a Spooler, the plot file path must be in the partition where the spooler is located. |
|
Plotter/Cutter Setting |
Click Setup to define the Plotter/Cutter settings. For more information, see Plotter/Cutter Setup. |
|
Plotter Page Size (X,Y) |
The size of the plotting/cutting page. X defines the width and Y defines the height. |
|
Scale Factor (X,Y) |
Use to change the plotting/cutting image scale. You can either enter a percentage or an absolute number. |
|
Output Manager |
Output Manager is a utility for managing the communication between all the attached Plotters in the Optitex system. Optitex software uses two different spoolers: OCC and Outman. Both spoolers support the RS232 protocol and the Gerber plotter (ACUUPLOT) protocol. Lectra E32 and E33 protocols, Optijet printer protocol, LPT communication (parallel) protocol and LAN (TCP/IP) printer protocol are only supported by OCC. |
|
Use Output Manager |
Select this checkbox if you want to use the Output Manager. |
|
Network Plotting |
Select this checkbox if you want to setup a network for the plotter. |
|
Output Manager Service |
Select the radio button of the Output you require: OCC or Outman. |
|
Alert on Start |
When the OCC spooler is used, this option is enabled for both spoolers - OCC and Outman. Select this checkbox if you want to send an alert when the plotting starts. |
|
Alert on End |
This option is only available if you selected the Outman spooler. Select this checkbox if you want to send an alert when the job ends. |
|
Remove on End |
This option is only available if you selected the Outman spooler. Select this checkbox if you want to delete all the plotted files after sending the job. Otherwise, they will remain on your computer. |
|
Copies |
Enter the number of job plotting copies you require. |
|
Disable remote station spooler windows |
Available only for the OCC spooler. Select this checkbox to hide the OCC software windows if your OCC queue is a Remote Queue. |
|
Selected Pieces Only |
Select this checkbox if you want to only plot the selected pieces, not all the pieces. |
|
Set Port View to Image Size |
Select this checkbox if you are using a "Fabric Pattern". This will then do the following:
|
|
General Plotter Attributes |
Click to define general Plotter attributes. For more information see, General Plotter Attributes. |
|
Grading Nest Plot Mode |
Select this checkbox if you want to plot grading differently. |