Marker Order Command
You can use the Marker Order command when you want to define the order details, including the number of sizes per style, number of plies, etc.
The Marker Order command can be accessed either via the main menu or via the Icon toolbar.
To run the Marker Order command:
-
Stand on the row of the file you require
Or
Select multiple files using Shift on your keyboard.
-
From the Main Menu, go to Commands > Marker Order.
A message appears asking if you want to use the current PDS for the style file.
-
Click OK if you want to use the current style file
Or
If you click No, then you can add your own style files.
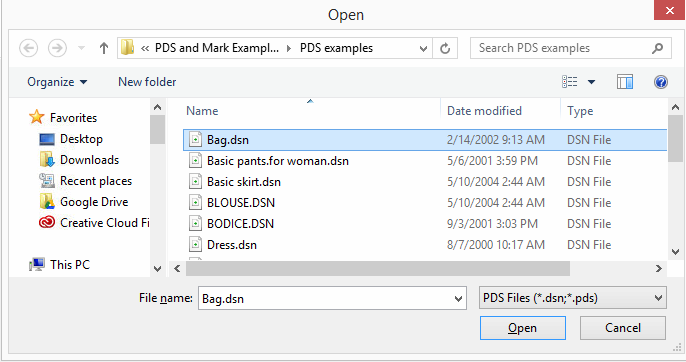
The Open dialog appears so you can add PDS file to be used as the styles in your order:

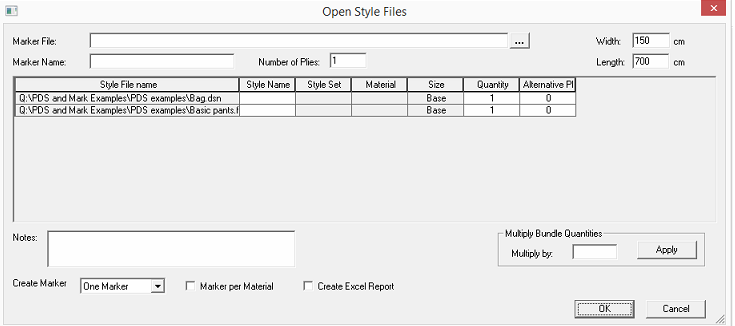
The Open Style Files dialog appears:
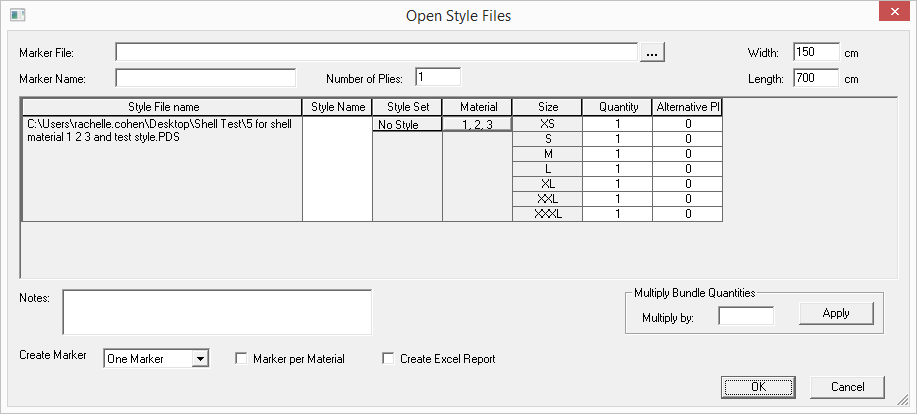
Note: This dialog is dynamic according to the type of file you select; meaning if you defined style sets, grading, etc. in your PDS file, they will appear as columns in the Open Style Files dialog.

-
To save the Marker Order to a defined location, in the Marker File field, click Browse and select the destination.
-
To provide a name for the Marker Order, in the Marker Name field enter a name.
-
In the Number of Plies field, enter the number of plies you require.
-
Define the Width and Length of the table.
-
Go into the table and define the properties of the PDS files as follows:
In the example below the PDS file was defined with grading, materials and style sets:

-
If you want to add a name for the style so you can easily recognize it, enter the name in the Style Name column.
-
If you have defined style sets, you can select the style set you require from the drop-down list.
-
If you have defined materials, you can select the material by clicking on the Material column and selecting the Used column next to the materials you require.
-
To define quantities for each size, in the Quantity column enter the number of sizes you require.
-
If you have a number of bundles, you can define a rotation. This is only available if you have more than one bundle. This is commonly used when you want to place the entire bundles with the same orientation, but for efficiency purposes the bundles are rotated. In the Alternative Placing column, enter the number of bundles you want rotated.
-
If you need to enter notes for the order, enter text in the Notes field.
-
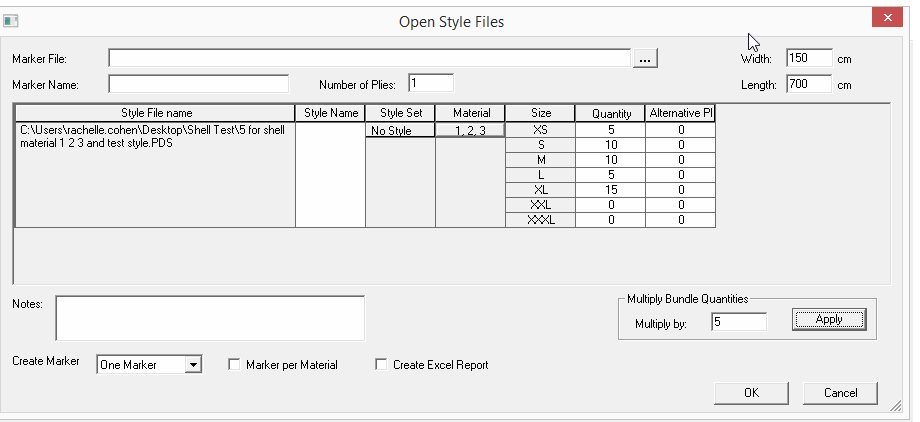
If you want to create multiple bundles by sizes, in the Multiple Bundle Quantities section, in the Multiply By field enter the number by which you want to multiply. This means each bundle of sizes will be multiplied by the specified number. If the value is 5, then Small = 5, M = 10 L = 15, etc
In the example below, the bundles were multiplied by 5:

-
In the Create Marker drop-down list, select how you want to create your marker:
-
One Marker: Creates one marker for all the styles.
-
Marker Per PDS: Creates a marker for each PDS file.
-
Marker Per Size: Creates a marker for each size.
-
If you have material defined in your PDS file, select the Marker Per Material checkbox, if you want to create a separate marker for each material.
-
Select the Create Excel Report checkbox, if you want to export the information to an Excel report.
-
Click Ok when you are done.
If you have created a Batch file, via Options > Save Batch File, the command will be added to you batch file.
Or
If you have not created a batch file, the marker order is created in the defined location.