Auto Change Notches Command
You can use the Auto Notches Conditions command when you want to define the settings of notches before nesting, plotting, reporting, and exporting marker files.
This allows you to change the notches' direction and the relationship between them on a piece or several pieces.
To run the Auto Change Notches Conditions command:
-
From the Main Menu, go to Commands > Auto Change Notches Conditions.
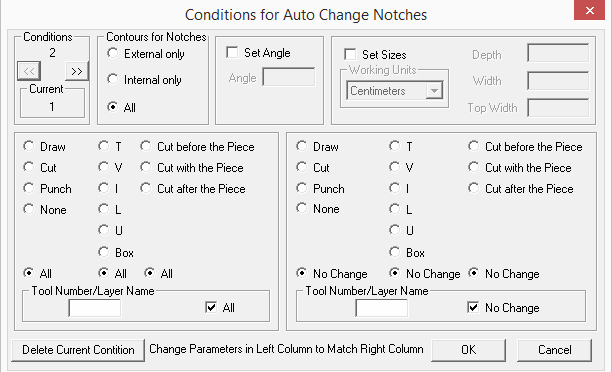
The Conditions for Auto Change Notches dialog appears:

You can create multiple conditions.
-
In the Conditions area, click the double arrows to define the condition.
The corresponding number appears.
In the example above there are two conditions and we are defining the first condition.
-
In the Contour for Notches area, define which notches will be changed according to their location – on the contour or on an internal segment.
-
Select the Set Angle checkbox, if you want to define the notch at a specific angle, for example 90 degrees.
-
In the Set Sizes area, select the Set Sizes checkbox, if you want to set the sizes.
-
Enter the required Depth and Width and Top Width.
-
Define the types of notches you are setting:
-
Click All to select all the types at once. Otherwise, select the radio button you require.
-
Command:
-
Draw
-
Cut
-
Punch
-
None
-
Type:
-
T
-
V
-
I
-
L
-
U
-
Box
-
Time
-
Cut before piece
-
Cut with piece
-
Cut after piece