Defining Cross Stitch Sections

You can define a cross section, when you need to create a cross stitch on your pleat. When creating the cross stitches you do not define a start and end, rather a point for the stitch.

To define a cross section:

  1. Open up your PDS file.

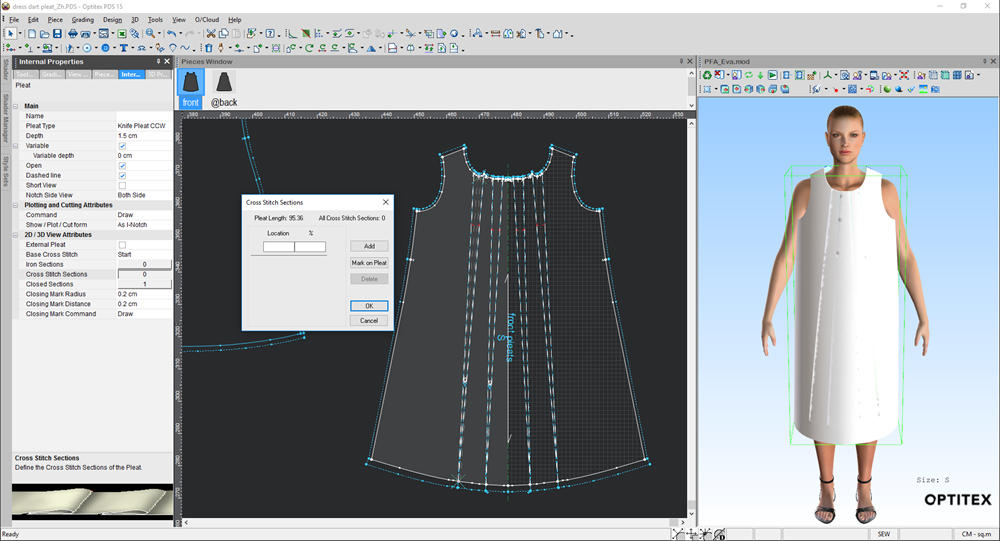
  1. Select your pleat to open the Pleat Properties dialog.

  1. Expand the Pleat 3D View Attributes section.

  2. In the Cross Stitch Sections field, click the button with the number. (This number reflects the number of cross stitches you defined.)

The Cross Stitch Sections dialog is displayed and your pattern is marked with an X to display the cross stitch:

  1. To define another cross stitch, you have a few different options. Click to expand an option.

ClosedManually Mark on Pleat

  1. Click Mark on Pleat.

The cursor becomes a Pleat marker.

  1. In the pattern, stand on the location where you want the cross stitch and then click with your mouse.

The pattern is marked with the cross stitch as follows:

  1. In the Cross Stitch Sections dialog, click Add.

ClosedManually Enter Cross Stitch

  1. In the Location field, enter the value of where the cross stitch should be added in CM

Or

In the % field, enter the location of the cross stitch in a percentage.

The system automatically fills in the other field with the appropriate value. Meaning, if you enter a value, the percentage is filled in and vice versa.

The cross stitch is displayed in the pattern as follows:

  1. In the Cross Stitch Sections dialog, click Add.

  1. When you are done, click Ok.

  2. Click Cancel if you do not want to save changes.