Digitize
Digitizing is the process of using a digitizing tablet and cursor to enter a handmade paper pattern to the computer. A digitizing tablet is an electronic board. Optitex software supports many different brands and sizes of digitizing tablets.
Icon & Location
-

-
Menu: File> Digitizer > Digitize
-
Toolbar: General
-
Toolbox: Window Tools
To use the digitizer:
-
From the main menu, go to File > Digitizer > Digitize
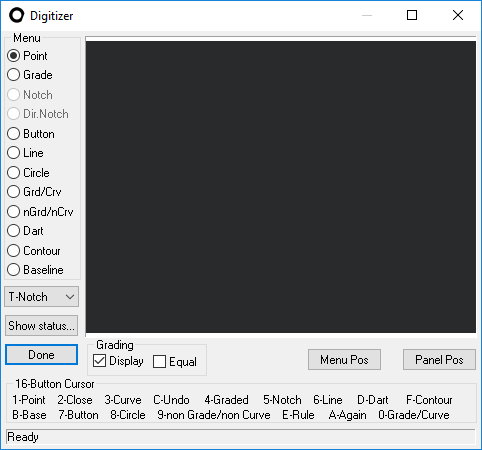
The Digitizer dialog is divided into three sections.
The left-hand section contains digitizer commands used with a four-button digitizer.
The right-hand section is a scaled down view of the digitizing tablet.
The lower section assigns a number to each button on the digitizer cursor.
View the fields as follows:
|
Field |
Description |
|
Panel Position
|
The digitizer panel contains all the piece attributes and information found in the Piece Properties. Using the digitizer panel eliminates the need to enter the relevant attributes and information into the Piece Info dialog box. You can customize the digitizer panel using the Edit Panel option in the Digitizer Setup dialog .
A colored rectangular area is displayed in the Digitizer dialog box; this area illustrates the panel position on the digitizer tablet. |
|
Menu Position |
If the digitizer cursor has only four buttons, attach a digitizer menu to the digitizer tablet. The digitizer menu enables you to define the location of various point types, notches, buttons, internal lines, etc. When using a sixteen-button cursor, the digitizer menu is not needed.
A gray rectangular area is displayed in the Digitizer dialog box; this area illustrates the menu position on the digitizer tablet. |
 See also: Digitizer Menu