Change Notch Gradings
The Change Notch Grading tool allows you to modify the attributes of all the notches in your pattern. You can use this dialog if you only want to modify notches (not other internal objects).
The dialog is dynamic according to the notches you have in your pattern, according to the selection you make in the dialog and according to the attributes that are defined inside your pattern.
It's important to remember if you make a change, but the system does not find anything that meets the criteria, then nothing will be changed.
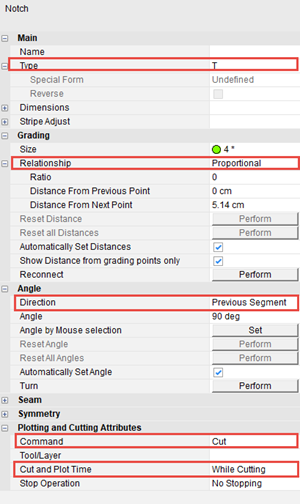
The attributes you are changing are according to the notch attributes as they are defined in your pattern:
To use the Change Notch Grading tool:
-
Go to Piece > General > Change Notch Gradings.
The Global Notch Grading dialog is displayed: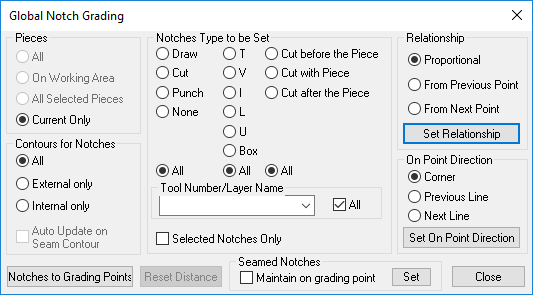
-
In the Pieces area, define how you want to search and where to apply the changes:
-
All: You want to search and apply changes to all pieces that are inside the pattern.
-
On Working Area: You want to search and apply changes to pieces that displayed in the Working Area.
-
All Selected Pieces: You can want to search and apply changes to all pieces that you selected (you can select multiple pieces with the selection rectangle).
-
Current Only: You want to search and apply changes to the current piece only.
-
-
In the Contoursfor Notches area, define where on the contour to search for notches:
-
-
All: You want to search for and apply changes to notches that are located all over the contour.
-
External Only: You want to search for and apply changes to notches that are located in the external contour only.
-
Internal Only: You want to search for and apply changes to notches that are located in the internal contour only.
-
-
Select the Auto Update on Seam Contour checkbox, if you want the notch of the seam to also be updated. This option is only enabled when Automatically Update the Notches, or Automatic Reseam are disabled.
-
In the Notches Type to be Set area, select the radio button of the command you want to change to: Draw, Cut, Punch, or select None if you do not want to change the command, or select All, if you want to change all the commands . For example, all notches will set to draw if you select Draw.
-
Select the radio button of the notch type you want to change to: T, V, I, L, U, Box, or select None if you do not want to change the type, or select All, if the notch type doesn't matter.
-
Select the radio button of the cut time: Cut before the piece, Cut with the piece, Cut after the piece, or select All, if the cut time doesn't matter.
-
In the Tool Number/Layer drop-down list, select the layer where the notches are located for the change or select All, if the layer doesn't matter.
-
Select the Selected Notches Only checkbox, if you want to apply changes only to notches that were selected before opening this dialog.
-
In the Relationship area, set the distance between the notch and the point: Proportional, From Previous Point,From Next Point, or click Set Relationship if you want to manually select the location.
-
In the On Point Direction area, set the direction of the notch on a corner point: Corner, Previous Line, Next Line, or click Set on Point Direction, if you want to manually set the point direction.
-
Click Notches to Grading Point if you want to calculate the distance between the notches and the grading points. You will only be able to see this if the Show Distance from Grading Points checkbox is cleared in the Notch Properties dialog.
-
Click Reset Distance, if you want to reset the notch's distance of all sizes according to the base size.
-
If you want to maintain seamed notches on the grading point, select the Maintain on Grading Point checkbox.
-
When you are done defining all the changes you want to make, click Set.
-
Click Close to close the dialog.