Change Internal Attributes
The Change Internal Attributes tool allows you to modify the attributes
of all your internals of different types at once.
The dialog is dynamic according to the type of internals you have in
your pattern, according to the selection you make in the dialog and according
to the attributes that are defined inside your pattern. For example, you
can globally change all V notches
that are Cut, to T
notches and Draw.
It's important to remember if you make a change, but the system does
not find anything that meets the criteria, then nothing will be changed.
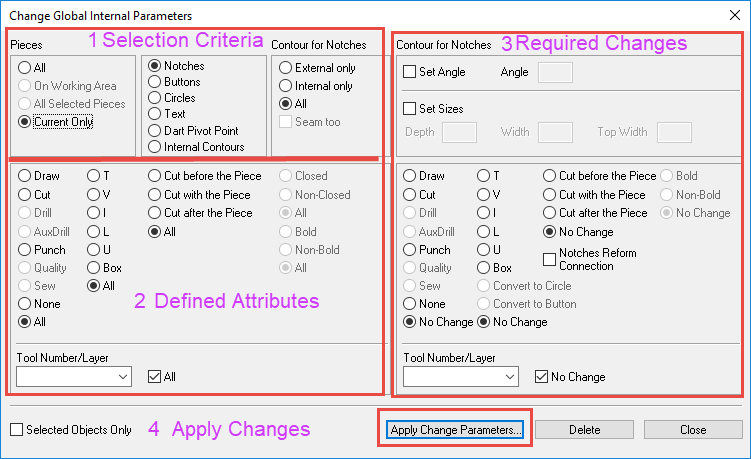
The Change Global Internal Parameters
dialog is divided into the following sections: (click on a link to jump
to that section in the steps below)
Selection
Criteria: Here you are defining how/what you are selecting
inside the pattern. You can define where to search for the internal objects,
which internal objects and the attributes you are changing.
Defined
Attributes: Here you can see which attributes are defined on the internal
object and the attribute you want to select in order to change (in the
Required Changes area).
Required
Changes: Here you are defining the changes you want to make
to the internal objects that meet the search criteria.
Apply:
Applies the required changes to all internal objects that meet the search
criteria.
To use the Change Internal Attributes tool:
The Change Global Internal
Parameters dialog is displayed.
Click on a section to expand and view how to perform
each step.
-
 Define
the Selection Criteria.
Define
the Selection Criteria.
-
In the Pieces
area, decide which pieces you want to define criteria for.
The following options are available:
-
All:
You want to apply the change to all pieces that are inside
the pattern.
-
On
Working Area: You want to apply the changes only
to pieces that are displayed in the Working Area.
-
All
Selected Pieces: You can want to apply the changes
to all pieces that you selected (you can select multiple
pieces with the selection rectangle).
-
Current
Only: You want to apply the change only to the
piece that is selected.
-
Select the type of internal you are
looking for inside the pattern (according to how you defined
in step 2): Notch,
Button, Circle,
Text, Dart
Pivot Point, or InternalContour.
-
In the Contour
for Notches area, decide if you want to look for the
internal object on the External
Contour, Internal
Contour or All if
you want to look all over.
-
Define
the Attributes to change
-
Select which cut/plot command you are
looking for: Draw,
Cut, Drill,
AuxDrill, Punch,
Quality, Sew.
(These are dynamic according to the type of internal.
For example, Punch is available for notches, but not for buttons.)
or select None, if
you do not want to change the command at all, or select All, if you want all commands
to be included in the criteria.
-
If you are looking for either notches,
or darts, select the notch type: T,
V, I, L, U, Box or select All
if you want all notch types included in the criteria.
-
Select the cut and plot time you are
looking for: Cut before the
Pieces,Cut with the
Piece, Cut After the
Piece, or select All,
if you want all cut commands included in the criteria.
-
If you are looking for internal objects,
select Closed, Non-Closed, or All,
if you want to include both closed and non-closed in the criteria.
-
If you are looking for text objects,
select Bold, Non-Bold, or All,
if you want to include both Bold and Non-Bold in the criteria.
-
If your pattern is defined with layers,
you can search for internal objects that are located in a
specific layer. From the Tool
Number/Layer drop-down list, select the layer or click
the All checkbox,
if you want to search all layers (not a specific one).
-
Define
the Required Changes
-
On the right hand side of the dialog,
in the Contour for Notches
area, if you want to change the angle for notches or text
object, select the Set Angle
checkbox, then enter the required angle.
 Note: This option is not enabled for Buttons, Circles, Dart Pivot Points
or Internal Contours.
Note: This option is not enabled for Buttons, Circles, Dart Pivot Points
or Internal Contours.
-
If you want to change the dimensions
of the internal object, select the Set
Sizes checkbox. This field is dynamic according to
the type of internal object you have selected.
-
Notch:
You can define the Depth,
Width and Top Width of the notch.
-
Button/Circle:
You can define the Radius.
-
Text:
You can define the Size
of the text.
-
Dart
Pivot Point: You can define the Radius
and Distance.
-
Internal
Contour: Disabled.
-
Now select the changes you want to make
(according to the search criteria you defined). This area
is dynamic according to the type of internal object you have
selected and the criteria that exists in the pattern.
-
Select the radio button of the cut/plot
command you want to change: Draw,
Cut, Drill,
AuxDrill, Punch,
Quality, Sew
or select None
if you want to remove the cut/plot command that is already
defined, or select No Change
if you want to keep the cut/plot command as is.
-
Select the radio button of the notch/dart
type: T, V, I, L, U, Box
or select No Change,
if you want to keep the type as is.
-
If you defined search criteria for buttons,
you can select the Convert
to Circle radio button if you want to convert the button
into a circle.
-
If you defined search criteria for circles,
you can select the Convert
to Button radio button if you want to convert the circle
into a button.
-
Select the radio button of the cut order
command: Cut before the Piece,
Cut with the Piece,
Cut After the Piece,
or select No Change
if you want to keep the cut order as is.
-
If you defined search criteria for notches,
you can select the Notches
Reform Connection checkbox, if you want the notches
to reconnect after cutting.
-
If you have defined search criteria
for text objects, you can change the text from Bold
to Non-Bold, or select
No Change to leave
the text as is.
-
If you want to change the layer, for
example, from 1 to 2 for all the internal objects, from the
Tool Number/Layer
drop-down list, select the layer you want to change to, or
select the No Change
checkbox, to leave the layers as they are.
-
If you want to apply changes only to
those that are selected, select the Selected
Objects Only checkbox.
-
Apply
all required changes
-
Once you are done defining the search
criteria and global changes, click Apply
Change Parameters. This applies the changes only to
those objects that meet the search criteria.
-
Click Delete,
if you want to delete all the internal objects that meet the
search criteria.
-
Click Close
to close the dialog.
 See also: General Piece Menu