Running Multiple Nestings
You can run multiple nestings via the Auto Nest Queue when you want to prepare a queue of Marker files, which can be left to nest overnight (as files). This allows you to create a list of Marker (MRK) files in a table and define the Marker Width, Marker Length, time to Run. You can use Batch Commands to set the values that are entered manually. This way you can achieve the highest efficiency among several markers for different factors and then you can choose the best one.
To run multiple nestings:
-
From the main menu go to Nesting > Auto Nest Queue.

-
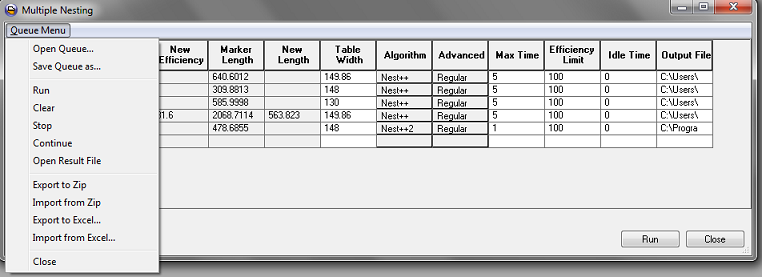
Click the Queue Menu to view the different options: (some of these options also work after selecting a row in the nesting queue grid.)

|
Option |
Description |
|
Open Queue |
Opens a saved Auto Nest Queue file (NSTML format) |
|
Save Queue as |
Saves the file. |
|
Run |
Runs the nesting process for all files. This should be used after all nesting configurations are completed. |
|
Clear |
Deletes files in the nesting queue. |
|
Stop |
Stops nesting in-between. |
|
Continue |
If the nesting was stopped, continues nesting from where it left off. |
|
Open Result File |
Opens the output file of the selected row. |
|
Export to Zip |
Exports the file to a Zip file. |
|
Import from Zip |
Imports a Zip file into the queue. |
|
Export to Excel |
Exports the results file to Excel. |
|
Import from Excel |
Imports an Excel file into the nesting queue. |
|
Close |
Closes the dialog. |
-
In the File name, click the little arrow to search for the Marker file you are adding to the batch. Press Shift or Ctrl to select multiple files.
-
Once you upload the file, the following fields are filled in:
-
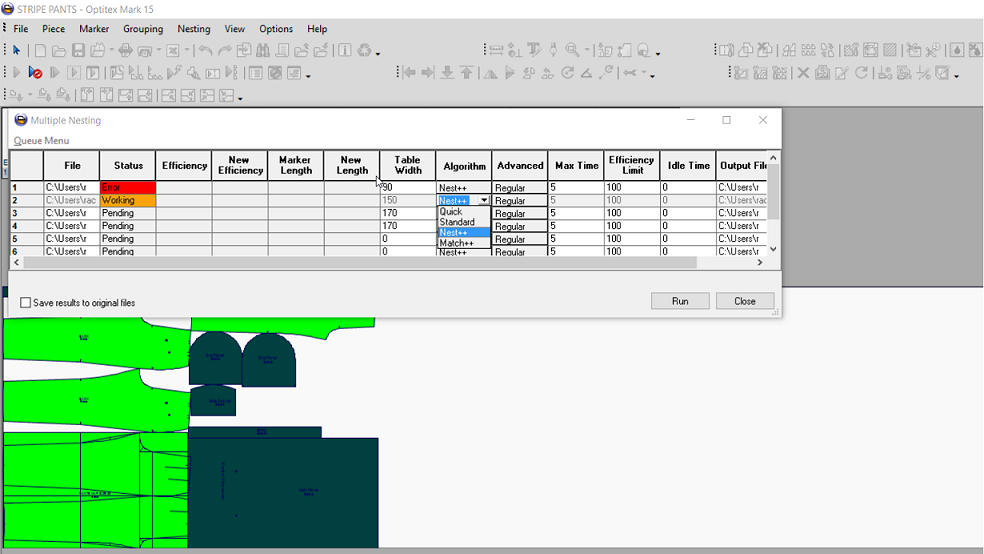
Status: Displays the status of the nesting:
-
Working: The file is in the middle of nesting.
-
Pending: The file is waiting to be nested.
-
Done: The file has completed nesting.
-
Error: An error occurred while nesting.
-
Efficiency: Displays the efficiency (how much cloth is being used and how much space is being saved) of the Marker in a percentage.
-
New Efficiency: Displays the efficiency after the Marker was nested. This column only appears after nesting.
-
Marker Length: Displays the length of the Marker.
-
New Length: Displays the new length of the marker after nesting. This column only appears after nesting.
-
In the Table Width column enter the fabric width.
-
Click on the Algorithm column and from the drop-down list select the algorithm you want to run for the file.
-
In the Advanced column, select one of the following options from the drop-down list:
-
Regular: Select if you want to run regular nesting. This means the table is cleared and all pieces will be nested.
-
Continue: Select if you want to continue nesting from where it left off. This means a nested piece will not be renested, the other pieces will be nested around it.
-
Renest: Select if you want to nest only pieces that are in the Working Area.
-
In the Max Time column, enter the maximum time you want the nesting to run for (in hours and minutes)
-
In the Efficiency Limit column, enter the percentage of efficiency you want to reach.
-
In the Idle Time column, enter the amount of time that will be sufficient for the nesting.
-
In the Output File column, click the little arrow to browse to the location where you want the output file saved.
-
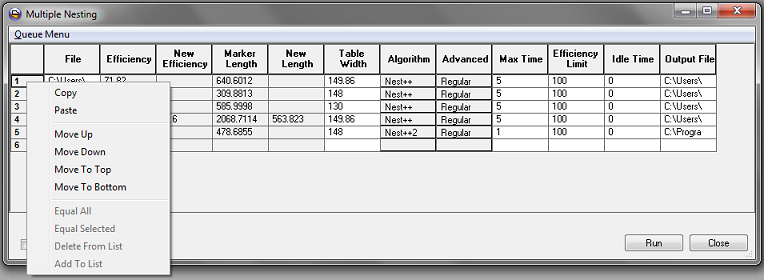
Once you have defined a queue you can change the order of the queue (which marker file will be nested next). While standing on the number column, right click with your mouse:

-
Click Move Up/Down to move the file in the queue.
-
Click Move to Top/Bottom to move the file to the first in the queue or the last in the queue.
-
When you are ready to start nesting, click Run.
-
If you want, you can edit files while they are running. For example, if a file is nesting and you want to change the algorithm, you can click on the Algorithm drop-down list and change the nesting algorithm for example from Nest ++ to Quick even while it is in the middle of nesting:
