Optimize Cut Order
The Optimize Cut Order option is used to optimize the numerically controlled (NC) cutting sequence prior to a cut file creation and for creating rules for the software for common line recognition. Please note that Auto-recognition of Shared is not part of the Optitex basic package and needs to purchased separately.
Icon & Location
-

-
Menu: Marker> Cut Order> Optimize Cut Order
-
Menu: Plot> Plot Dialog box > Optimize Cut Order Before Plotting.
To use the Optimize Cut/Order option:
From the main menu,
go to Marker > Cut Order > Optimize
Cut Order.
The Cut/Plot Order Optimization
dialog appears: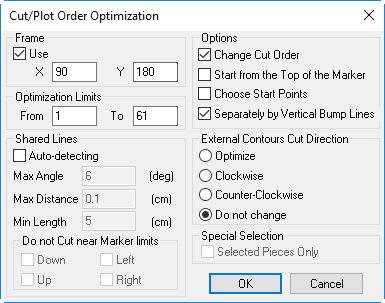
View the fields as follows:
|
Field |
Description |
|
Use Frame, X and Y |
When Use Frame is enabled, enter the X and Y maximum frame value of your cutter. The cut order numbers will change to meet the frame values. Most modern cutters do not need this option checked. |
|
Change Cut Order |
This option allows the program to decide if to cut pieces in the clockwise or counterclockwise direction in order to get the best cut order sequence as possible. |
|
Start from Top of Marker |
By Default, the cutting always starts from the bottom left of the marker. Select this option in order to start from the upper side of the marker. |
|
Choose Start Points |
The start point is assigned according to the location of the piece and its neighboring pieces. New start points for each piece will be determined based on the location of the piece on the marker and to reduce idle time. When this function is on, the process might override starting points that were assigned in PDS or in the marker by the Change Cut/Plot Start Point Tool. |
|
External Contour Cut Direction |
Check the Optimize option for best results . Clockwise and ContourClockwise will change the cut direction of the pieces' outside contour accordingly. |
|
Shared Lines |
This area defines the automatic recognition of Shared lines (Common lines) between pieces on the marker. |
|
Max Angle |
The maximum Angle between the two lines that will still be considered as the same cut line. |
|
Max Distance |
How apart the lines can be and still be recognized as the same cut line. |
|
Min Length |
Lines that are shorter than the minimum length will not be shared. If there is an angle, you have to define the maximum Angle that is allowed to be recognized as the same line. |
|
Do Not Cut Near Marker Limits |
Allows the system to remove the cut line from piece that is placed on the fabric edge in order to save cutting time. |
To Optimize Pieces Cutting Sequence for most cutters:
-
Open the Cut/Plot Order Optimization dialog from the menu or from the Plot dialog.
-
In the External Contour Cut Direction area, select the Optimize radio button and make sure that Change Cut Order is selected.
-
Click OK to apply the changes and close the dialog.
-
Use the View Cut Order mode to view the new cut sequence and to change in manually if needed.
To Defined Shared lines (Common lines) between pieces:
-
Open the Cut/Plot Order Optimization dialog from the menu or from the Plot dialog.
-
In the Shared Lines area, select the Auto Detecting checkbox.
-
Use the default values or enter your own values.
-
Click OK to apply the changes and close the dialog.
-
Use the View Cut Order mode to view the new cut sequence and Select Piece Cut Order to check if a cut line is shared.