Marker Definitions
Use this command to specify or change options related to the current marker, including the marker size, layout, waste, fabric spreading method, etc.
Icon & Location
-

-
Menu: Marker> Marker Definitions
-
Toolbar: Marker Tools
To view the Marker Definitions dialog:
From the main menu,
go to Marker > Marker Definitions.
The Marker Definitions dialog appears: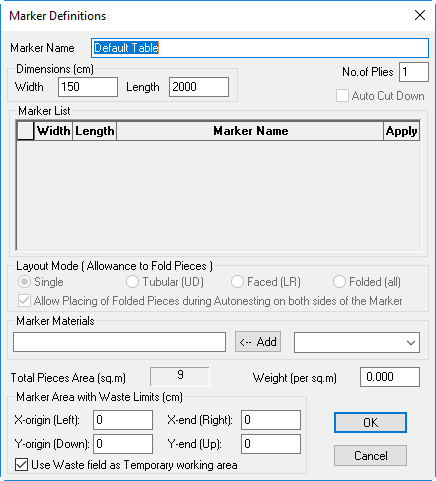
In the Marker
Name field, enter the name of the table you are defining.
Note:
By default the Default Table appears.
In the Dimensions area, if you want to change the size of the table, enter the required Width and Length.
If you want more than one ply, in the No. of Plies field, enter the number you require. If a single piece is placed on a Marker with 10 plies, then this piece automatically appears as placed 10 times.
In the Marker List area, you can see a list of all the markers The list saves the Width, Length and Marker name. If you want to load the settings, click Apply.
In the Layout Mode area, select the type of layout for the Marker table. The following options are available:
Single: No pieces can be folded.
Tubular: Tubular layout refers to fabric that is sold in a tube; pieces can be folded on the upper or lower edges of the Marker. Tubular markers must have at least 2 plies. The fabric can be spread all face up or all face down. Foldable pieces in the up and down directions will have the letter 'U' beside them.
Faced: Faced layout refers to fabric that must be spread face to face with folds on the right and left side. Faced Markers must have at least 2 plies. Pieces can be folded on the right and left edges on the Marker. Foldable pieces in the left and right directions will have the letter "S" beside them.
Folded: Folded layout refers to tubular fabric that has been spread face to face with folded edges on the right and left side. Pieces can be folded on the upper, lower, right, and left edges of the Marker. Folded Markers must have at least 2 plies. Foldable pieces in the up and down directions will have the letter "U "beside them. Foldable pieces in the left and right directions will have the letter "S" beside them.
Select the Allow Placing of Folded Pieces during Autonesting on both sides of the Marker, allow pieces to be folded on the upper and the lower sides of the Marker in the autonest processes. This option is enabled only when Folded is selected in the Layout Mode.
In the Marker Materials area, select the materials that the marker will serve while auto nesting. For example,
Marker Materials is defined as cotton.
Piece A is defined as cotton.
Piece B is defined
as leather.
When auto nesting (e.g., Nest++2) is executed, only piece A (cotton) will
be placed.
Note:
This is not the Materials Selection for the order.
In the Total Pieces Area (sq. m), indicate the total net. area of the Marker.
In the Marker
Area with Waste Limits (cm)area, if the fabric has poor edges,
waste zone needs to be defined (at any side of the Marker table). This
area is off-limits during automatic nesting, but it is possible to place
pieces manually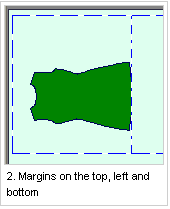
Select the Use Waste field as temporary Working Area
checkbox, if you do want the pieces that are in the waste area to be reduced
from the Piece Bar.