Layout Calculations
Calculate the optimal layout according to estimated or real fabric,
waste and nesting values.
Note:
At least one piece should be placed in order to perform calculations.
Icon & Location
-

-
Menu: Marker> Calculations> Optimum Layout Calculations
-
Toolbar: System Tools
To use the Layout Calculations option:
From the main menu,
go to Marker > Calculations > Optimum
Layout Calculations.
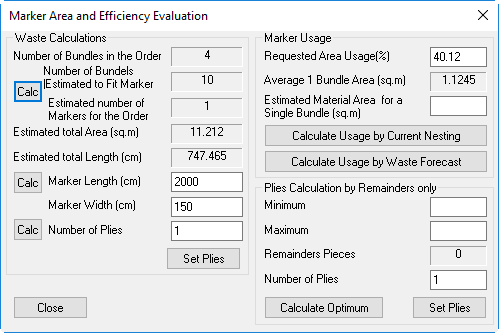
The Marker Area and Efficiency Evaluation
dialog appears:
View the fields as follows:
|
Field |
Description |
|
Waste Calculations |
Calculations can be made according to a fixed Width and Length, or according to a Fixed Width only (Width can be changed manually, but it will not be changed automatically while clicking on any of the "Calc" buttons). Note: The calculations do not change the Width, Length and Plies in the Marker Definition. Plies can be changed by clicking on the "Set Plies" button. |
|
Number of Bundles in Order |
Displays the total number of bundles defined in the order. |
|
Number of Bundles (Estimated to Fit Marker) |
Displays the total number of bundles that will fit the Marker. |
|
Estimated number of Markers for the Order |
Displays the number of plies that are needed to complete the order, according to the ' Number Of Bundles Estimated To Fit Marker’. In the following example:
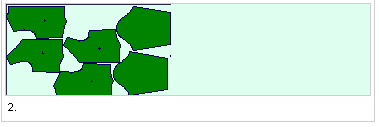
After placing the first bundle, the estimation is that only 2 bundles can fit the Marker.
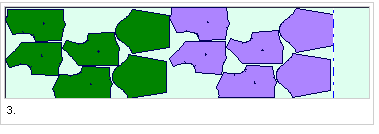
Placing another bundle – estimation was correct – only 2 bundles fit the Marker.
Number of plies should be 5 – e.g. same marker should be cut five times in order to get the 10 bundles. |
|
Estimated Total Area |
Displays the estimated total area for all the bundles in the order. |
|
Estimated Total Length |
Displays the estimated length that will be required for the bundles (i.e., 2 markers of 1000cm is needed, but only 950cm will be cut). |
|
Marker Length |
You can either click Cal to calculate the length based on the waste fields, or you can enter your own length. |
|
Marker Width |
You can either click Cal to calculate the width based on the waste fields, or you can enter your own width. |
|
Number of Plies |
You can either click Cal to calculate the number of plies or manually enter the number of plies and then click Set Plies to set the value. |
|
Marker Usage |
|
|
Requested Area Usage |
Sets the estimated/ real efficiency of the marker. Click on the " Calculate Usage by Current Nesting" to set this field with the current efficiency. For example, enter 80 in the area usage window, and then click "Calc" next to the 'Plies' - the value will change according to the nesting. |
|
Average 1 Bundle Area |
This is the average square area needed in order to place a single bundle. |
|
Estimated Material Area For A Single Bundle |
If the average material area (yield) is known, nesting calculations can be done according to it - enter a number, and click on the "Calculate Usage by Waste Forecast" button. |
|
Plies Calculation by Remainders |
This section is used to calculate and find the optimum number of plies needed for a cutting job. Enter the Minimum and Maximum plies. Maximum will usually be set according to the cutting machine, and the Minimum according to convenience. |
|
Number Of Plies |
This field is filled automatically when clicking on the " Calculate Optimum" button, but it also can be changed manually. Changing this field will automatically update the 'Reminders Pieces' field. |
|
Reminders Pieces |
The amount of pieces (not of bundles),
that will be cut as extra to the original order. This field shows
only positive values, it means it will not show 'missing pieces',
if not enough plies are being cut. In the following example:
By cutting the 3rd Marker - Reminders Pieces is 12 (2 extra bundles). |
|
Calculate Optimum (Button) |
This will calculate the number of plies needed for the order with the least piece reminders according to the Minimum/ Maximum plies. The result will appear in the 'Number Of Plies' field. |

