Edit Piece
You can use the Edit Piece option to edit your piece's geometry - including rotating, flipping, folding and cutting the selected piece.
In the Edit Piece dialog, you can select more than one piece and size, so that you can apply the same modifications to all or selected sizes/pieces.
The Edit Piece dialog also contains a preview window that allows you to see the changes you are making, on the fly. You can make all your changes and check them using the preview - and then apply them.
Icon & Location
-

-
Menu: Piece > Edit Piece
To use the Edit Piece option:
Select a piece (either from the Pieces window, or if pieces are placed on the table, select a piece on the table.)
From
the Marker menu, select Piece, Edit
Piece. The EditPiece
dialog appears: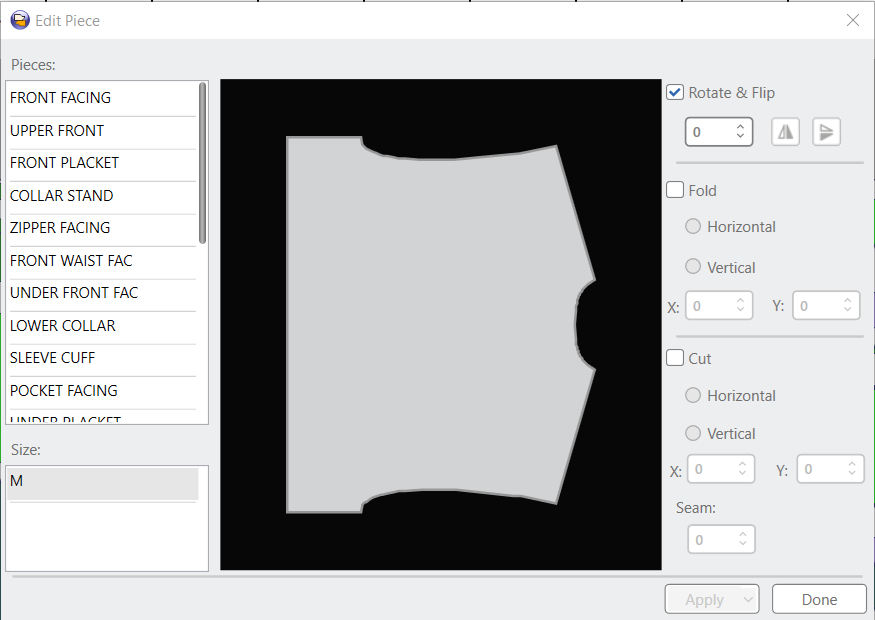
Select
a piece and size from the list on the left. The Piece list contains the
list of pieces available within the Marker file, and the Size list contains
the list of sizes available for the selected piece.
Note:
You can select multiple pieces and sizes by using the Shift and Control
keys.
Note: You can choose from the following operations - either rotate & flip, fold, or cut. These operations are not mandatory, but rather optional separate actions.
Click Rotate & Flip to rotate and/or flip the piece. This enables you to rotate the piece's geometry in the selected direction (either CW or CCW), and flip the piece either horizontally or vertically.
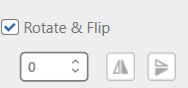
In
the Angle field, define the angle
you require. This value can be either positive or negative; a positive
value rotates the piece in the CCW direction, and a negative value rotates
the piece in the CW direction.
Click
the Flip icons to flip the piece
either horizontally or vertically. When the Horizontal/Vertical buttons
are clicked, the piece flipping is performed.
Click
Fold to fold the piece around
a vertical or horizontal line. Use the X/Y options to specify the position
of the folding line relative to the center of the box surrounding the
piece.
Note:
The Fold option is available for
each piece where a buffer is not applied; i.e., if the currently selected
size has no defined buffer, the Fold
option is enabled. Otherwise, this option is disabled.

Click Cut to cut the current piece with the specified cutting line into two pieces - which will then be added to the Piece bar. The Cut options enable you to specify the cutting line position and orientation, as well as the width of the seam allowances for the piece. Use the X/Y options to specify the position of the cutting line relative to the center of the box surrounding the piece.

Note:
The result of cutting is that there will be two separate pieces. Once
a piece is cut, the quantity of newly-created pieces is inherited from
the original piece. The original piece remains visible within the Piece
list; however its quantity is set to 0. So for example when cutting a
piece with a quantity of 4 to two parts A and B, there will be 4 A parts
and 4 B parts. The quantity of the original piece is reset to 0 to avoid
quantity duplication.
Apply Options
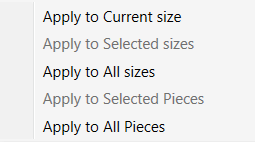
The Apply drop-down list provides you with the following options:
-
Click Apply to Current Size to apply the editing to the currently selected size of the currently selected piece. This option is available by default when the Apply button is clicked.
-
Click Apply to Selected Sizes to apply the editing to all selected sizes. This option is enabled when multiple sizes are selected. When a single size is selected, this option is disabled.
-
Click Apply to All Sizes to apply the editing to all sizes of the currently selected piece.
-
Click Apply to Selected Pieces to apply the editing to all sizes of all selected pieces. This option is enabled when multiple pieces are selected. When a single piece is selected, the Apply to Selected Sizes option is disabled.
-
Click Apply to All Pieces to apply the editing to all sizes of all pieces available in the current Marker file.
Click Close to close the dialog.