Creating a Marker
Once you have your patterns ready you can now create a marker table. You first have to define the size of your marker table and other properties. This is normally done based on the nature of your material and product.
To create a Marker table:
-
Go to File >New.
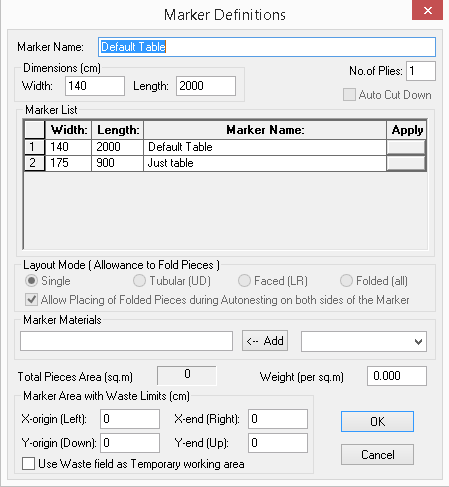
The Marker Definitions window appears automatically:

-
Enter a name for your table.
-
In the Dimensions field, enter the width of the fabric and the length of the cutting table. If your cutting length is unlimited, then make sure you enter a value that is large enough to fit all your pieces.
-
If you are spreading more than one ply or you are using tubular material, then enter the number of plies that will be spread.
-
In the Layout Mode area, select the radio button of the type of layout you prefer.Select Single, if no pieces need to fold. Or select Tubular if the pieces need to fold.
Note: Tubular refers to fabric that is sold in a tube; pieces can be folded on the upper or lower edges of the marker. Tubular markers must have at least 2 plies. In order to place pieces on the fold, pieces must have “folding allowance “assigned to them in the piece properties.
-
To associate a material for your fabric, In the Marker Materials area, from the drop-down list right select the type of material and click ADD. The material appears in the empty field.
-
If you are cutting knit material, you can add the weight of the material in the Weight field. This information will be used for cost calculation.
-
Once you are done defining your Marker, click OK.
The marker table is created and the new marker information is added to the Marker List area. This saves your marker properties so that next time you can just select the marker to quickly load it with all of its defined dimensions.