Numonics Digitizer
Settings
-
Numonics : ASCII
-
ASCII Options : CR, LF , Sep, Flag
-
Baud Rate : 9600
-
Data bits: 7
-
Parity: Even
-
Stop bits: 2
-
Modes : Point
-
Increment Size : 0 - Off
-
Stream Rate : MAX
-
Resolution : 1000 Per Inch or 40 Per MM
-
beeper : Enable
-
To Finish Press Save Configuration -> Application 1 , then Exit -> Confirm Changes
PDS Settings
-
Open PDS , go to File menu >> Digitizer Setup
-
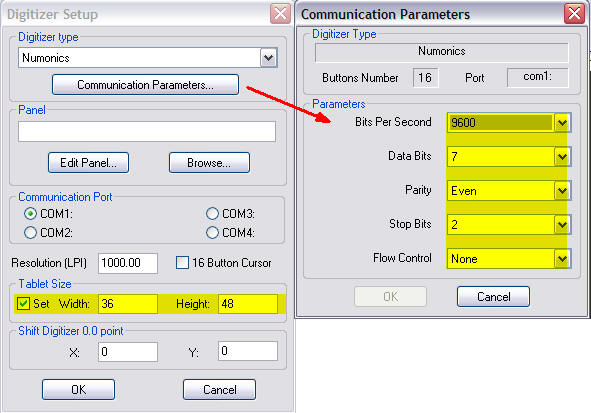
Choose Numonics from the list - this will bring all the communication setting, you can check if they are as describe in the picture bellow by clicking on the Communication Parameters button.

-
The COM port depends on you hardware configuration.
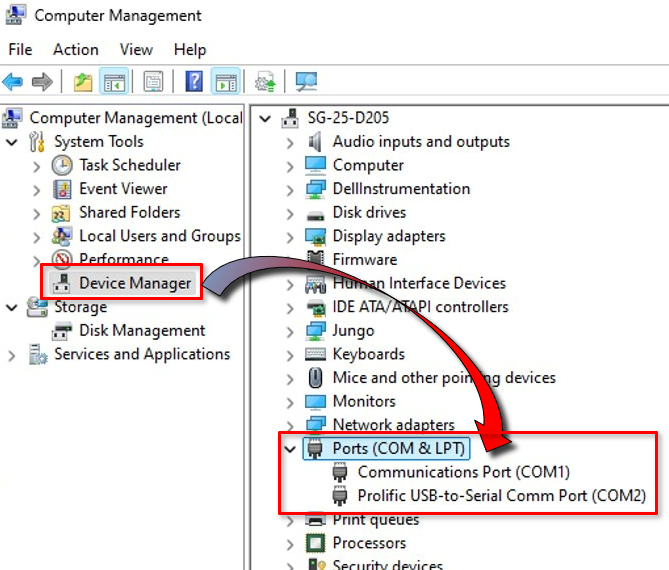
 Note: Com Port setting must match the actual com port to which the digitizer is connected.
Check the Windows Device Manager to see the correct com port.
For example:

-
Numonics digitizer comes in two different size 36"X48" and 44"X60".
Troubleshooting
Numonics Panel Configuration
Setting the origin
-
Place the cursor over the on the M mark (next to 1 and 2) located in the lower right corner of the tablet, just outside of the active area. With the cursor over this box, the tablet will emit a rapid series of beeps.
-
Depress and hold any button of the digitizer mouse on the bottom right of the digitize. The AccuGrid will now emit a solid tone. Continue to hold the cursor button until the tablet emits a single beep confirming activation of the softkey.
-
The AccuGrid will now emit a slow repetitive sequence of beeps. This is prompting to locate the menu origin of the Panel.
-
Place the cursor over the Menu Origin bulls-eye which is located at the bottom, middle of the setup menu just below the Numonics logo. With the cursor over the bulls-eye, depress and hold any cursor button down until the AccuGrid emits three quick beeps confirming the menu has been located.
-
You can now start to change the settings according to the yellow marks on the picture.
-
When stepping over a setting with the cursor the led lights up
-
When stepping over active setting the digitizer emits a beep.
-
Make sure to load and save the settings.
 See also: Optitex Supported Digitizers