Marker Questions
This section covers questions related to the Optitex Marker.
Click on a question to expand the answer. Click again to collapse.
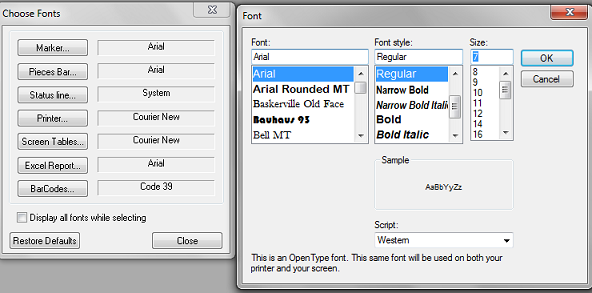
 The Pieces bar
is really big and the Marker area is really small. What is wrong and how
can I fix this?
The Pieces bar
is really big and the Marker area is really small. What is wrong and how
can I fix this?
Go to Options
> Fonts and make sure that all fonts are set to 7.
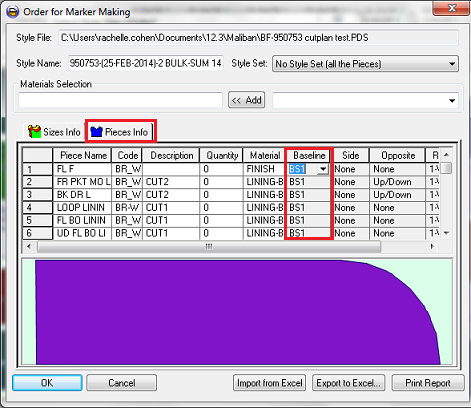
How
do I select the grainline instead of the baseline when ordering pieces
to the marker?
In the Order
For Marker Makingdialog,select thePieces
Infotab. Look for the Baseline
column and select the type of baseline from the drop-down list next
to the desired piece as follows:
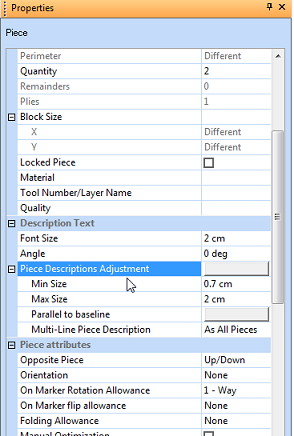
The piece descriptions are too big on the
marker. How can I make sure that the text fits inside the pieces?
From
the main menu go to Piece
> Global Info > Piece Descriptions Adjustment before
you load the style files.
I
have T notches in my file but when I plot, it plots as L notches. Why
is this?
This usually happens if the T notch command
is set to CUT. Cutting machines cannot cut T notches, therefore it
changed to I.
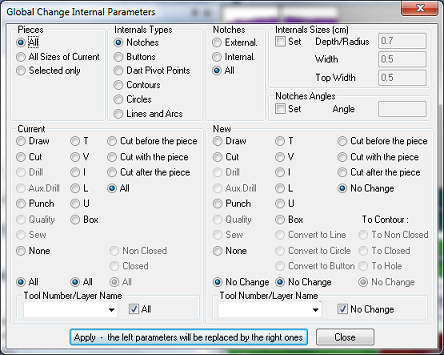
The notches command
has to be changed to DRAW. You can change all existing Notches on
the marker at once via the Global
Internal Parametersdialog.
Go toPiece > Internals
> Global Internal Parameters.
You can also do
this via the PDS.
What
is the best PC configuration for nesting?
There are no special requirements for
Nesting, they are the same as regular 2D requirements.
Keep in mind that
the nesting process strongly depends on a number of other processes
occurring simultaneously on the computer. Thus, the most powerful
processor will give the best results in the shortest amount of time.
How
do I place pieces on the fold in tubular material?
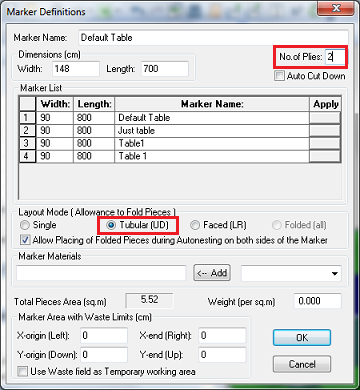
First,
make sure that the following conditions are met:
My computer
crashed while working on a marker, how can I open a backup file?
Go to File
>File Utilities > Open Backup Marker File.This will automatically open the
last file that you worked on.
You can change the location of the
file in the Preferences dialog.
Go to Preferences > File Options>
AutoSave File Name (Backup File)
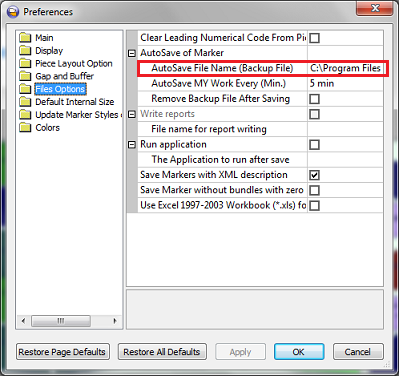
Note:You can also find older backup
files in this location.
How can I make sure that the marker includes
the latest version of the style files?
-
Go to File
> Open Style File.
-
Select and highlight
the Style file from the list.
-
Click >>
and then select Update Selected
Style.
Note:
You can also have the software look for changes automatically by selecting
the Check Style File before Opening
checkbox in the Preferences
dialog.
Can
I generate PDS files from the Marker?
Yes.
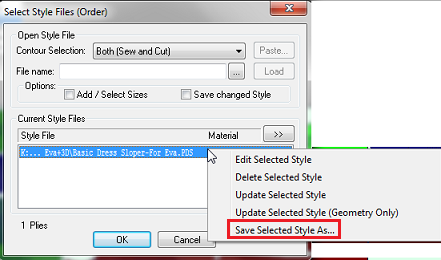
From the main menu, go to File >
Open Style file (Order). In the Select
Style file (Order) dialog, under Style
File, right click a style file and select Save
Selected Style As… as follows:
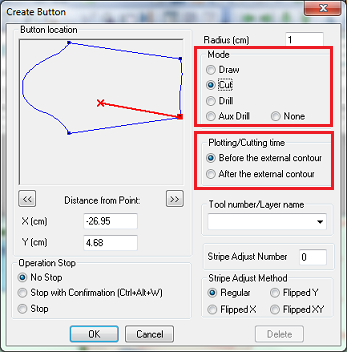
I
want my buttons to look like + (plus signs) instead of circles. How can
I do this?
From the main menu, go to Piece
> Internals > Global Internal Parameters, and
change the Button attributes to Draw as follows:
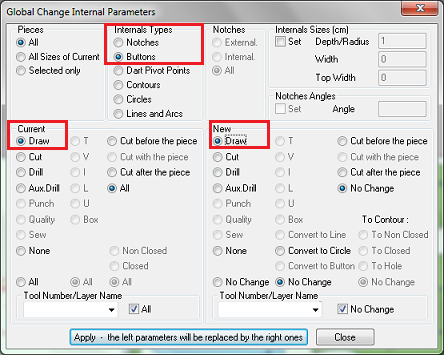
On the menu go to Piece > Internals > Internals
or Global Internals parameters and change the buttons attributes to
Draw
Why
have I received the following message - “There Are No Plotting Segments
On External Contours Of Pieces"
This
error appeared, because one or more of the pieces have a partial cut
contour defined. This can be caused if you loaded an older file of
Optitex. If you are using version which is older than 11.3, you will
have to fix this manually. Select the piece that has the problem then
in the Cut Order dialog, click Restore to reset the default contour.
From
version 11.4 and above click Yes
in the confirmation message and it will be fixed for you automatically.
How
can I create a match between 2 or more pieces?
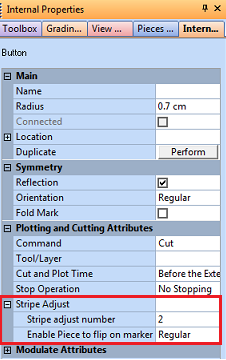
You can match 2 pieces by using notches
or buttons. The Notches and Buttons must be assigned with Stripe Adjust
numbers in the properties dialog in the PDS. In order for 2 or points
to match - give them the same Stripe Adjust number. For example, if the
side seams of the front and back should line up, add a notch on both
pieces in the matching location, and assign them the same “stripe
adjust “ number.
In the Marker ,after the first
piece is placed, the rest of the pieces will determine where it needs
to be located based on the location of the match point. Notches or
Buttons with the same number will be placed at the same coordinates
from the repeat. You cannot have notches with the same stripe numbers
on one piece.
Note:If you would like the stripe adjust
point (notch or button) to match a particular location on the repeat,
Use Relate Pieces on A Stripe command.
How come nesting does not nest small pieces
inside holes on big pieces?
Only Nest++2 and Nest++PRO can
place pieces inside a hole automatically. The strand and the Nest++
algorithm are not capable of doing this.
My
V notches do not plot with the outside contour even though I set it up
as "together with contour".Why is this?
In the PDS Preferences
dialog, make sure that you have the Plot the notch with contour checkbox
selected as follows:
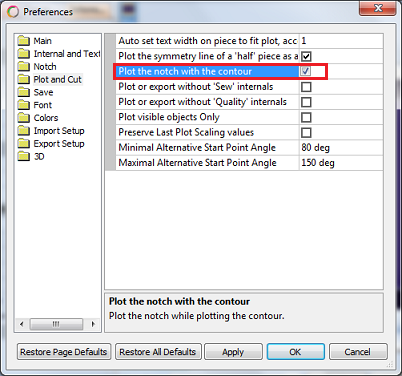
Also make sure that in the Marker all notches are set to Cut mode
and they are set to plot together with the contour in the Notch properties
as follows: